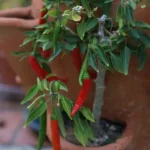
Most people assume growing vegetables means having outdoor space. It doesn’t. Growing radishes in containers indoors gets you from seed to harvest in 23 days — no garden, no plot, no waiting for spring.
Radishes are compact, unfussy, and forgiving enough that most first attempts actually work. Radishes indoor care comes down to two things more than anything else: thinning your seedlings and keeping the soil consistently moist. Get those right and the rest mostly takes care of itself.
What follows covers varieties, containers, light, watering, and pests — plus a few things most guides skip, like succession sowing so you’re not stuck with 30 radishes ripening on the same Tuesday, and whether the greens are actually worth eating (they are).
Radishes are just one of many vegetables you can grow indoors without any special setup if you know where to start. If you enjoy the idea of growing your own food at home, you might also want to explore growing microgreens as a beginner — they’re just as simple and ready even faster.
In This Article
Best Radish Varieties for Indoor Container Growing

Not all radishes are created equal when it comes to container radish gardening. The best varieties for indoor radishes are compact, fast-maturing, and suited to shallow soil.
Cherry Belle is the gold standard for beginners. It matures in just 23 days, produces perfectly round, bright-red bulbs, and handles container life beautifully. It’s ideal for small spaces.
French Breakfast is a slightly longer, cylindrical variety that matures in around 30 days. It has a milder flavour than Cherry Belle and works well in deeper containers.
Sparkler is another excellent choice — a round, red-and-white variety ready in about 25 days with a crisp, mild bite.
Easter Egg is a fun mixed variety that produces radishes in red, purple, pink, and white. It matures in 25–30 days and makes for a visually striking indoor radish garden.
Daikon radishes are technically possible indoors but require containers at least 18 inches deep and much more patience — better left to experienced growers.
Pro tip — succession sowing: Instead of planting all your seeds at once, sow a new batch every two weeks. Rotate between fast varieties like Cherry Belle (23 days) and slower ones like French Breakfast (30 days). This keeps a steady stream of fresh radishes coming all month rather than one overwhelming harvest.
Choosing the Right Container for growing radishes in containers indoors
When deciding what container to use for growing radishes indoors, two things matter most: depth and drainage.
Radishes develop underground, so they need room to push downward. A minimum depth of 6 inches works for round varieties like Cherry Belle. French Breakfast and other elongated types need at least 8–10 inches. Daikon types, if you attempt them, need 18 inches or more.
Width matters too. A 12-inch wide container can comfortably hold 8–12 radish plants when properly thinned. Window boxes are fantastic for growing radishes in small spaces — long, shallow, and easy to place on a sill or shelf.
Material-wise, plastic pots retain moisture better than terracotta, which is helpful since radishes like consistent soil moisture. However, terracotta breathes better and reduces the risk of waterlogging if you tend to overwater.
Whatever you choose, drainage holes are non-negotiable. Waterlogged roots lead to rot, cracking, and poor bulb development. If your container doesn’t have holes, add them — or place a layer of gravel at the bottom as a temporary fix (though holes are always better).
Self-watering containers are worth the investment if you’re forgetful about watering, since consistent moisture is one of the biggest factors in getting good radish bulb development.
Radishes Indoor Care: Everything You Need to Know
Caring for radishes indoors is surprisingly straightforward once you understand what these fast-growing root vegetables actually need. Unlike many indoor plants that demand constant attention, radishes thrive with a consistent, no-fuss routine, but skip the basics and they’ll let you know quickly. Here’s a complete breakdown of radishes indoor care so your crop stays healthy from seed to harvest.
Watering: The Most Critical Part of Radishes Indoor Care
Radishes are about 95% water, which means soil moisture directly affects the quality of your harvest. The golden rule is to keep the soil consistently moist but never waterlogged. Overwatering is the number one mistake indoor growers make, soggy soil leads to root rot, cracked radishes, and bitter flavor.
Check the top inch of soil daily. If it feels dry to the touch, water thoroughly until it drains from the bottom of the container. If it still feels damp, hold off another day. In heated indoor environments, containers tend to dry out faster than you’d expect, so daily checks are non-negotiable, especially in winter when indoor heating pulls moisture from the air quickly.
Light Requirements
Proper radishes indoor care means giving your plants at least 6 hours of direct or bright indirect sunlight per day. A south- or west-facing windowsill is your best bet. Without adequate light, radishes go leggy, they put all their energy into producing tall, weak greens instead of developing the plump root you’re after.
If natural light is limited in your space, a full-spectrum grow light placed 4–6 inches above the plants for 12–14 hours a day works excellently. This is especially useful during short winter days when windowsill light simply isn’t enough.
Temperature and Air Circulation
Radishes are cool-season crops and prefer indoor temperatures between 50°F and 65°F (10°C–18°C). They can tolerate a little warmer, but anything consistently above 75°F (24°C) causes them to bolt , meaning they rush to flower and seed rather than forming a proper root.
Keep containers away from heat vents, radiators, and spots with drastic temperature swings. Good air circulation also matters: stagnant air encourages fungal issues, so placing your containers near a gently circulating fan or a cracked window (in mild weather) helps keep foliage dry and disease-free.
Soil and Container Setup
The foundation of good radishes indoor care starts with the right growing medium. Use a loose, well-draining potting mix, never dense garden soil, which compacts in containers and physically blocks root development, causing forked or misshapen radishes.
Your container needs to be at least 6 inches deep for standard varieties like Cherry Belle or Scarlet Globe. If you’re growing longer daikon-style varieties, aim for 12 inches or more. Make sure your pot has adequate drainage holes, sitting water at the bottom is a fast track to root rot.
Fertilizing Indoors
Unlike heavy-feeding vegetables, radishes are light feeders. If you’re using a quality potting mix, you likely won’t need to fertilize at all for a single crop cycle (radishes mature in just 22–30 days). However, if you’re doing successive plantings in the same soil, a balanced liquid fertilizer (10-10-10) diluted to half strength applied once after germination is plenty.
Avoid high-nitrogen fertilizers, excess nitrogen pushes leafy top growth at the expense of root development, which is the opposite of what you want.
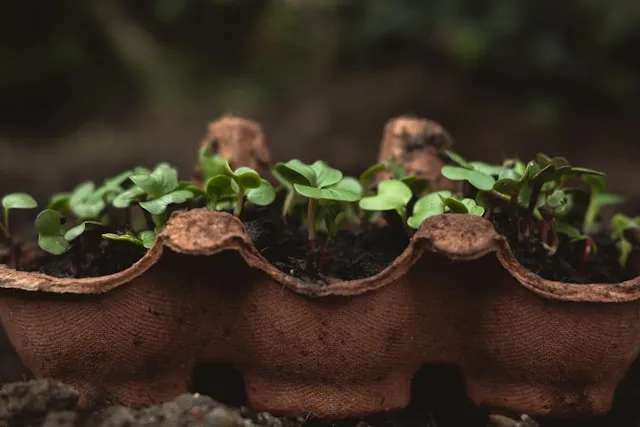
Thinning: The Step Most Indoor Growers Skip
One of the most overlooked aspects of radishes indoor care is thinning seedlings properly. Once sprouts reach about an inch tall, thin them so each plant has 2–3 inches of space on all sides. Crowded radishes compete for nutrients and space underground, resulting in small, underdeveloped, or strangely shaped roots.
Yes, it feels counterintuitive to pull out healthy seedlings, but it’s the single biggest difference between a mediocre and a great harvest. Use scissors to snip at soil level rather than pulling, so you don’t disturb neighboring roots.
Common Mistakes to Avoid When Growing Radishes Indoors
Avoiding these mistakes growing radishes in containers will save you a lot of frustration:
Skipping thinning. The single most common error. Overcrowded radishes don’t develop bulbs. Thin ruthlessly to 2 inches apart.
Too much nitrogen. A fertilizer heavy in nitrogen produces impressive leafy tops and virtually no root. Choose a low-nitrogen or balanced feed — or skip fertilizer entirely with a good potting mix.
Inconsistent watering. Letting soil dry out then flooding it causes cracked bulbs and woody texture. Aim for even, consistent moisture.
Wrong container depth. Using a container shallower than 6 inches for round varieties or 8–10 inches for elongated types stunts root development.
Harvesting too late. Radishes left past their peak become pithy and bitter fast. Check from around day 23 onward.
Side-only light. If your only light source is a side window and you’re getting tall, leggy plants with thin roots, you need to either rotate containers frequently or invest in a grow light positioned overhead.
Sowing too many at once. Planting a whole packet at once leads to a glut of radishes ripening simultaneously. Succession sow every two weeks instead.
Wrong temperature. Growing radishes in a warm room above 75°F consistently leads to bolting before the roots develop. Keep them cool.
Soil, pH, and Fertilizer for Container Radishes
The best soil for growing radishes in pots is loose, light, and well-draining. Radishes hate compact or heavy soil, when roots hit resistance, they fork, become woody, or fail to develop properly.
Use a good quality potting mix rather than garden soil, which tends to compact in containers. Mix in some perlite (about 20–30% by volume) to improve drainage and aeration. Coarse sand works as an alternative.
pH: Radishes prefer a slightly acidic to neutral pH of 6.0–7.0. Most standard potting mixes fall in this range. If you’re unsure, a basic soil pH tester (available cheaply online) takes the guesswork out. Overly acidic or alkaline soil leads to poor nutrient uptake and stunted growth. Best PH for growing vegetables.
Fertilizer: Radishes are light feeders, especially in the root department. This is important: avoid fertilizers high in nitrogen. Too much nitrogen pushes leafy top growth at the expense of the root bulb, you’ll end up with beautiful green leaves and a disappointing, tiny radish underneath.
If you want to fertilize, use a balanced, low-nitrogen fertilizer (look for an NPK with a low first number, like 5-10-10) applied once at planting. Alternatively, mix a slow-release fertilizer into your potting mix before sowing. In most cases, a good potting mix has enough nutrients for radishes to complete their short growing cycle without any additional feeding.
Light Requirements: Sunny Window vs. Grow Lights
This is one area where indoor radish gardening gets a bit more nuanced, and it’s something most guides gloss over.
Do radishes need grow lights indoors? Not necessarily, but it depends heavily on what kind of light you can provide.
Sunny window: Radishes need 6–8 hours of direct sunlight daily. A south-facing window in the northern hemisphere is your best option. East or west-facing windows can work but may produce slightly slower growth.
Here’s the crucial issue though: window light comes from the side, not overhead. When light only hits plants from an angle, they grow tall and leggy, reaching toward the source. This means thin stems, poor root bulb development, and a weaker plant overall. You’ve probably seen this with any houseplant near a window that leans noticeably toward the glass.
Overhead vs. side lighting — why it matters: Radishes, like most vegetables, develop their best root systems when the plant stays compact and upright. Overhead or near-overhead light keeps the plant growing straight down, directing energy into the bulb rather than stretching the stem. A grow light positioned 4–6 inches directly above your containers solves this completely.
Grow lights: A basic LED grow light set to 14–16 hours per day more than compensates for window limitations. Full-spectrum LEDs are affordable, energy-efficient, and genuinely transform indoor radish results. If you’re serious about apartment vegetable gardening with radishes, a grow light is one of the best investments you can make.
If using a window, rotate your containers every couple of days so plants don’t lean too heavily in one direction.
How to Plant Radish Seeds in Containers Step by Step
Follow these simple steps to plant radish seeds in containers indoors and get the best germination and root development. This method works for all beginner-friendly varieties like Cherry Belle and French Breakfast.
Step 1. Prepare and Pre-Moisten Your Potting Mix
Fill your container with a loose, well-draining potting mix to about one inch below the rim. Water it thoroughly and allow it to drain completely before sowing. You want the soil evenly moist but not waterlogged — soggy soil at sowing time leads to poor germination and damping off.
Step 2. Make Shallow Planting Holes or Furrows
Using your finger or a pencil, make individual holes or shallow furrows half an inch (1–1.5 cm) deep across the surface of the soil. Space holes roughly 1 inch apart. Radish seeds are small and germinate best at shallow depths — deeper than half an inch slows germination significantly.
Step 3. Sow One to Two Seeds Per Hole
Drop one or two seeds into each hole. If sowing in rows, space seeds about 1 inch apart along each furrow. Sowing two seeds per hole gives you a backup in case one fails to germinate — you’ll thin to one plant per spot later.
Step 4. Cover Lightly and Firm the Soil
Cover the seeds with a thin layer of potting mix and gently firm the surface down with your fingertips. Avoid pressing too hard — you just want good seed-to-soil contact without compacting the mix around the seed.
Step 5. Water Gently Without Displacing Seeds
Use a spray bottle or a watering can with a fine rose head to water the surface gently. A heavy pour at this stage can shift seeds out of position or wash them to one corner of the container. Keep the surface consistently moist until germination, which typically happens within 3–7 days.
Step 6. Place in Your Light Position
Move your container to a south-facing window or directly under a grow light positioned 4–6 inches overhead. Overhead light is preferable to side window light — plants receiving light only from the side grow tall and leggy rather than compact, which reduces root bulb development.
Step 7. Thin Seedlings to 2 Inches Apart
Once seedlings have their first true leaves — usually 1–2 weeks after germination — thin them to one plant every 2 inches. Snip extras at soil level with scissors rather than pulling, to avoid disturbing neighboring roots. Do not skip this step. Overcrowded radishes produce all leaf growth and no bulb. Use thinned seedlings as microgreens — they’re edible and flavorful.
Watering, Thinning, and Temperature for Indoor Radishes
Watering: Knowing how to water radishes in containers indoors is where many beginners go wrong. Radishes need consistently moist soil, not wet, not dry, not fluctuating between the two. Inconsistent watering is the number one cause of cracked, woody, or forked radishes.
Check the soil daily by pushing your finger about an inch into the soil. If it feels dry at that depth, water thoroughly until it drains from the bottom. If it’s still moist, leave it another day. A self-watering container makes this much easier.
Thinning: If you haven’t thinned your seedlings, do it as soon as they’re 1–2 inches tall. Final spacing should be 2 inches between plants. Skipping this step is a common mistake, crowded radishes don’t have space to form bulbs and end up spindly and weak.
Temperature: Radishes are cool-season vegetables. They prefer temperatures between 50–65°F (10–18°C). They’ll tolerate slightly warmer conditions indoors, but anything consistently above 75°F (24°C) causes them to bolt, sending up a flower stalk instead of developing a root. Keep them away from radiators, heating vents, or hot sunny windowsills in summer.
Common Pests and Diseases in Indoor Container Radishes
One of the genuine advantages of growing radishes indoors is the reduced pest pressure compared to outdoor gardening. That said, a few issues can still find their way in.
- Aphids are the most common indoor pest. They cluster on leaf undersides and stunt growth by sucking sap. Check undersides of leaves regularly. A strong spray of water dislodges them, or use a diluted neem oil solution as a gentle treatment.
- Fungus gnats are tiny flies whose larvae live in the soil and can damage young roots. They thrive in consistently wet soil. The fix is to allow the top inch of soil to dry slightly between waterings and use a thin layer of sand on the surface as a deterrent.
- Flea beetles occasionally appear even indoors, creating tiny holes in leaves. Row cover fabric or fine mesh over your containers keeps them out.
- Damping off is a fungal condition that causes seedlings to collapse at the base shortly after germination. It’s caused by overwatering and poor air circulation. Ensure good drainage, avoid overcrowding, and if you have a fan nearby, a gentle air flow helps significantly.
- Companion planting tip: If you’re growing radishes alongside other containers, keep nasturtiums nearby, they act as a trap plant, luring aphids away from your radishes. Radishes themselves, with their peppery scent, help deter cucumber beetles and aphids from neighbouring plants like lettuce and spinach.
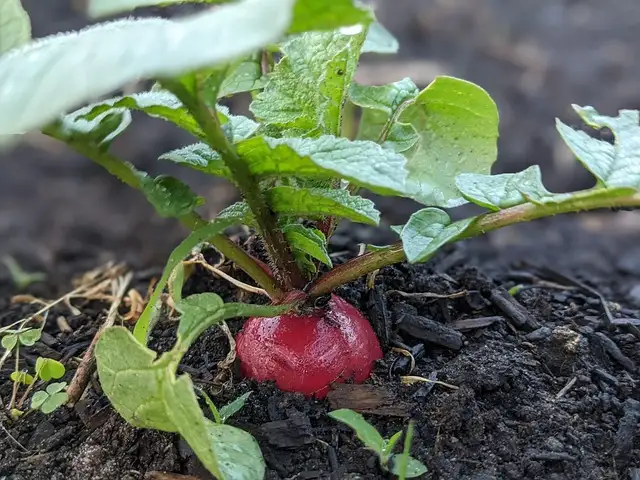
When and How to Harvest Indoor Container Radishes
Knowing when to harvest radishes grown in containers makes the difference between a crisp, flavorful radish and a hollow, woody one.
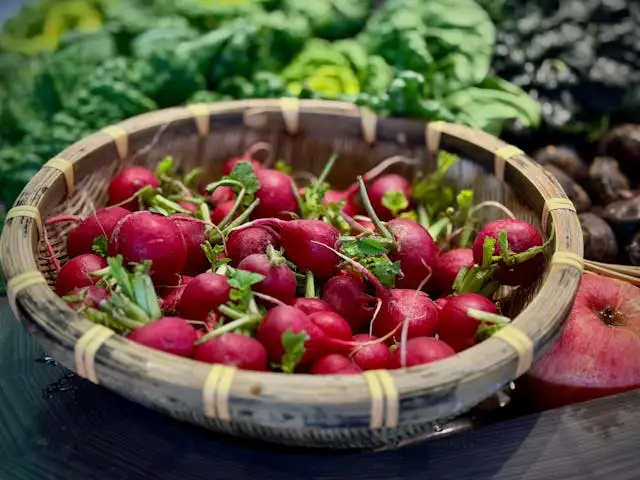
Most round varieties are ready 23–30 days after sowing. The easiest sign is visible: you’ll see the top of the radish bulb pushing out of the soil surface. At that point, gently pull one and check, it should be firm, smooth, and the size stated on the seed packet (usually marble to golf ball size for round types).
Don’t wait too long. Radishes left in the ground past their peak become pithy, woody, and develop an overpowering, bitter heat. A few days makes a significant difference.
To harvest, grip the base of the leaves and pull firmly upward while slightly wiggling. In loose container soil, they come out easily.
Radish greens are edible too: Mature radish leaves can be eaten raw (they’re slightly fuzzy and peppery) or cooked like spinach. They’re nutritious and completely edible — don’t discard them unless you dislike the flavour.
Saving seeds: Want free radish seeds for next time? Let one or two plants bolt (go to flower). They’ll produce long seed pods that are also edible, mildly spicy and crunchy, great in stir-fries. Once the pods turn brown and papery, harvest them, dry for a week indoors, and store in an airtight container. Radish seeds stay viable for up to 5 years. Use heirloom varieties like French Breakfast if you want true-to-type seeds from saved stock.
Health Benefits of Homegrown Radishes
Beyond the satisfaction of growing your own food, there’s a solid nutritional case for adding radishes to your indoor garden.
The nutritional benefits of radishes are impressive for such a small vegetable. Radishes are rich in Vitamin C, which supports immune function and skin health. They contain folate, important for cell repair and healthy development. Potassium in radishes supports heart health and helps regulate blood pressure.
Radishes are also a source of antioxidants including anthocyanins (responsible for the red and purple pigments), which have anti-inflammatory properties. They support digestive health thanks to their fibre content and have traditionally been used to support liver function.
At roughly 16 calories per 100g, radishes are one of the most nutrient-dense, low-calorie vegetables you can grow. If you’re eating the greens too, which most people don’t, you’re getting additional calcium, Vitamin K, and iron that most guides completely ignore.
Homegrown radishes harvested at the right time also tend to have better flavour and nutrient density than supermarket radishes, which are often stored for extended periods before reaching shelves.
Frequently Asked Questions
How deep should a container be for growing radishes indoors?
For round varieties like Cherry Belle, a minimum of 6 inches deep is sufficient. Elongated varieties like French Breakfast need 8–10 inches. Never use a container shallower than 6 inches, or the bulbs will have nowhere to grow.
How long do radishes take to grow in containers indoors?
Fast varieties like Cherry Belle mature in as little as 23 days from sowing. Most standard varieties are ready between 25–35 days. Check daily from day 20 onward by looking for the bulb crown pushing out of the soil.
Can I grow radishes indoors without a grow light?
Yes, if you have a south-facing window that receives 6–8 hours of direct sunlight daily. However, side-only window light can cause leggy growth and poor bulb development. A grow light positioned overhead gives significantly better results, especially in winter or in north-facing rooms.
Why are my indoor radishes all leaves and no root?
Three likely causes: too much nitrogen fertilizer, overcrowding (skipped thinning), or insufficient light. Ensure you’re using a low-nitrogen soil or fertilizer, thin plants to 2 inches apart, and provide at least 6 hours of overhead or direct light daily.
How often should I water radishes in containers?
Check the soil daily. Water thoroughly when the top inch feels dry to the touch. Radishes need consistently moist — not waterlogged — soil. Inconsistent watering is the most common cause of cracked or woody radishes.
What is the best pot size for growing radishes indoors?
A 12-inch wide container holds 8–12 plants comfortably once thinned. Window boxes work excellently. Depth matters more than width — prioritise at least 6 inches deep for round varieties.
Why are my radishes cracking or splitting?
Cracked radishes are almost always caused by inconsistent watering — particularly letting the soil dry out and then giving a heavy soaking. Keep moisture even and harvest promptly once mature to avoid splitting in the soil.
Can I grow radishes in an apartment with no outdoor space?
Absolutely — this is one of the easiest vegetables for apartment vegetable gardening. A sunny windowsill or a small grow light setup is all you need. Radishes mature so quickly they’re ideal for small indoor spaces.
Are radish leaves edible?
Yes. Thinned seedlings make excellent microgreens. Mature leaves can be eaten raw in salads (they have a slightly peppery, fuzzy texture) or cooked like spinach. The seed pods that form after bolting are also edible and mildly spicy.
How do I stop my radishes from bolting indoors?
Bolting (sending up a flower stalk instead of developing a root) is triggered by heat and long days. Keep indoor temperatures below 75°F (24°C), away from radiators and heating vents. Harvest promptly at maturity and choose fast-maturing varieties that complete their growth cycle before heat stress sets in.