If you’ve ever wanted to grow something fresh at home but didn’t know where to start, sunflower microgreens are honestly one of the best places to begin. They’re fast, forgiving, and you don’t need any gardening experience to get them right. Whether you have a windowsill or a small corner in your kitchen, growing sunflower microgreens is something almost anyone can pull off in under two weeks.
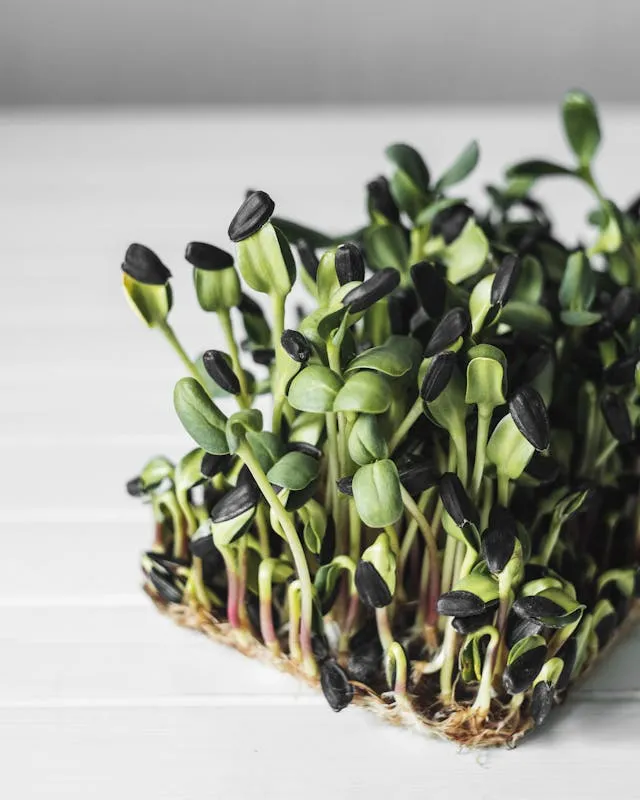
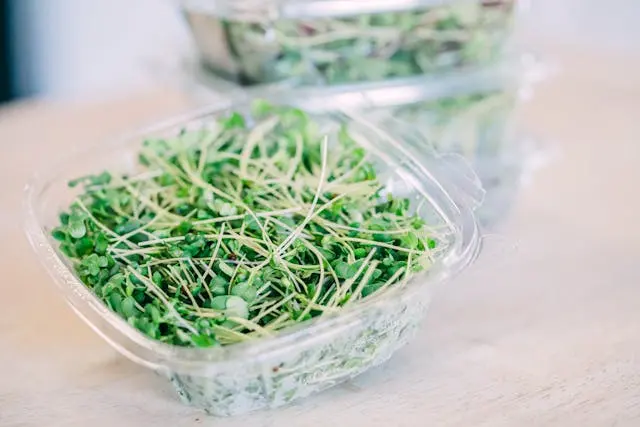
So what exactly are sunflower microgreens? They’re young sunflower seedlings harvested just after the first leaves appear, usually around 7 to 12 days after planting. They’re thicker and more substantial than most other microgreens, with a slightly nutty flavor and a satisfying crunch that works great in salads, sandwiches, and smoothie bowls.
The reason microgreens sunflower varieties have gotten so popular is simple, they pack a serious nutritional punch in a tiny package, and they’re genuinely fun to grow. This guide walks you through how to grow sunflower microgreens step by step, even if you’ve never grown anything before.
In This Article
Affiliate Disclosure: This post contains affiliate links. If you purchase through these links, I may earn a small commission at no extra cost to you. This helps keep the website and blog running so I can continue creating free content. Thank you for your support!
| Common Name | Sunflower microgreens, sunflower shoots |
| Botanical Name | Helianthus annuus |
| Family | Asteraceae |
| Microgreen Type | Cotyledon stage seedling |
| Mature Size | 4–6 inches tall at harvest |
| Sun Exposure | Bright indirect light or grow lights |
| Growing Medium | Well-draining potting mix or coconut coir |
| Soil pH | 6.0–7.0 (slightly acidic to neutral) |
| Days to Harvest | 7–12 days |
| Seed Soak Required | Yes, 8–12 hours |
| Difficulty Level | Easy (beginner friendly) |
| Toxicity | Non-toxic to humans and pets |
What Are Sunflower Microgreens?
Sunflower microgreens are the young seedlings of the common sunflower plant, harvested at the cotyledon stage, that’s when the first pair of leaves has just opened up but before the true leaves start growing in. At this point they’re usually somewhere between 4 to 6 inches tall and absolutely packed with nutrients.
Sunflower Microgreens vs Sprouts — What’s the Difference?
A lot of people confuse them with sprouts, but they’re actually pretty different. Sprouts are germinated seeds grown in water with no soil involved, you eat the whole thing, root and all. A sunflower microgreen, on the other hand, is grown in soil or a growing medium, and you only harvest the stem and leaves. That extra step makes a big difference in texture, flavor, and food safety since there’s much less moisture and way less risk of bacterial growth.
What Makes Them Different From the Full-Grown Plant?
Compared to a fully mature sunflower plant, sunflower shoots microgreens are harvested incredibly early, we’re talking less than two weeks versus an entire growing season. But here’s the thing: that tiny seedling actually contains a concentrated burst of the vitamins and enzymes the plant needs to get its start in life, which is exactly why microgreen sunflowers have gotten so much attention from the health crowd.
They taste mildly nutty and slightly sweet, with a thick crunchy stem that holds up well in salads and wraps. Think of them as sunflower seeds in plant form, same family, way more fun to eat.
Best Seeds for Sunflower Microgreens
Picking the right seeds is honestly where a lot of beginners go wrong, not because it’s complicated, but because there are a few traps worth knowing about before you buy. When it comes to sunflower seeds for microgreens, you don’t need anything fancy, but you do need to be a little specific.
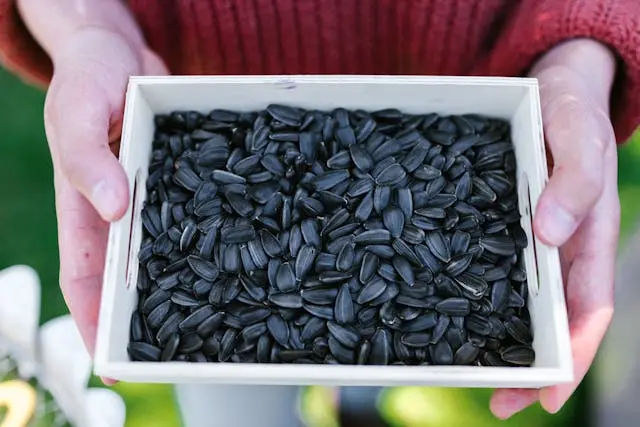
Black Oil Sunflower Seeds — The Best Option
If you want one straight answer, it’s this: black oil sunflower seeds for microgreens are the go-to choice, and pretty much every experienced grower will tell you the same thing. These are the small, thin-shelled, all-black seeds, not the striped ones you snack on. The thin shell makes germination faster and more even, the plants come up strong and uniform, and the flavor is that classic nutty-sweet taste people love about sunflower microgreens.
When you’re shopping, look for sunflower microgreen seeds that are labeled specifically for sprouting or microgreen use. These are untreated, meaning no fungicides or coatings that can mess with germination or end up in your food. They’ll cost a little more than generic seeds but the germination rate is noticeably better and it’s just safer overall.
Buy Them Here: https://amzn.to/3OxN5YA
Food-Grade vs Bird Seed — What You Need to Know
This one comes up a lot in microgreen communities and the honest answer is: it depends, but be careful. Bird seed sunflower microgreens is a real thing, plenty of growers use black oil sunflower seeds sold as bird feed and get perfectly fine results. The seeds themselves are often the same variety. The issue is that bird seed is not always held to food-grade standards, which means it may have been stored in conditions you wouldn’t want near something you’re eating, and some batches have been treated with pesticides or anti-mold agents not meant for human consumption.
If you go the birdseed route, buy from a reputable source, check that the bag explicitly says untreated, and accept that germination rates can be inconsistent. For beginners especially, it’s just easier to start with seeds labeled and sold for growing, you’ll have fewer headaches and more confidence in what you’re putting on your plate.
For a deeper look at sunflower microgreen seeds alongside other top varieties, with detailed info, honest reviews, and buy links all in one place — check out our Best Microgreen Seeds to Grow — Ranked, Reviewed & Ready to Order. It’s the one-stop blog we put together so you don’t have to go hunting across ten different tabs just to figure out what to buy.
Do You Need to Soak Sunflower Seeds?
yes, and it makes a real difference. Soaking sunflower seeds for microgreens before planting speeds up germination, softens the hull so the seedling can push through more easily, and gives you a more even tray overall. Skip it and you’ll likely end up with patchy growth and seeds that take their sweet time sprouting.
How Long to Soak
For most people, 8 to 12 hours is the sweet spot, overnight works perfectly. Just drop your seeds in a jar or bowl, cover them with cool water, and let them sit. You’ll notice them start to swell up as they absorb the water, which is exactly what you want. Don’t go past 12 hours though. Over-soaking is a thing, and it can lead to seeds that rot before they even get a chance to sprout.
Does Everyone Soak?
When it comes to do you soak sunflower seeds for microgreens, the answer from most growers is yes, but some skip it and still get decent results, especially if they’re growing in a humid environment or using a misting-heavy setup. That said, for beginners sprouting sunflower microgreens for the first time, soaking is a low-effort step that meaningfully improves your chances of a full, healthy tray. There’s really no good reason to skip it.
For a full breakdown of how to prep different microgreen seeds before planting including soaking times, rinsing tips, and which seeds need special treatment, head over to our Microgreen Seed Preparation Guide. It covers everything in one place so you’re not second-guessing yourself at planting time.
How to Grow Sunflower Microgreens (Step-by-Step)
This is the part you actually came for. Everything up to this point was context, this is where the growing happens. The best way to grow sunflower microgreens is simpler than most people expect, and once you’ve done it once, the whole process becomes second nature. Follow these steps in order and you’ll have a full tray ready to harvest in under two weeks.
A complete step-by-step guide to growing sunflower microgreens at home — from soaking your seeds to harvest day. No experience needed, just a tray, some soil, and a bright spot in your home.
Step 1 — Soak the Seeds
Measure out your seeds first. A standard 10×20 tray typically needs around 1 to 1.5 cups of black oil sunflower seeds. Put them in a bowl or jar, cover with cool water, and leave them for 8 to 12 hours. Overnight is the easiest approach, soak before bed, plant in the morning. After soaking, drain and give them a quick rinse. They should look slightly swollen and feel softer. If any seeds are floating after a few hours, pull them out, they’re likely duds that won’t germinate.
Step 2 — Prepare Your Tray
You’ll need two trays: one with drainage holes for planting, one solid tray underneath to catch water. Fill your planting tray with about an inch to an inch and a half of moist growing medium. Potting mix or coconut coir both work well. You want the soil damp but not soggy, if you squeeze a handful and water drips out, it’s too wet. Level it off with your hand or a flat card so the surface is even. Uneven soil means uneven growth, and that adds up fast across a full tray.
Step 3 — Plant the Seeds
This is how to plant sunflower seeds for microgreens properly: spread your soaked seeds across the surface in a single, even layer. They can touch each other but shouldn’t be piling on top of one another. Once they’re spread out, press them gently into the soil with your hand or the bottom of a flat tray — good seed-to-soil contact is important and a lot of beginners skip this step. Give them a light misting with a spray bottle, then you’re ready for the blackout phase.
Step 4 — Blackout Period
Stack your second tray on top of the seeds and add some weight — a couple of books or another tray with something heavy works fine. This does two things: it keeps the seeds pressed into the soil as they germinate, and the darkness triggers strong, even root development. Keep them in blackout for 3 to 4 days. Check once a day, give a light mist if the soil looks like it’s drying out, and otherwise just leave them alone. By day 3 or 4 you’ll lift the cover and find a tray full of pale yellow sprouts pushing up — that’s your cue to move to light.
Step 5 — Light & Watering
Once the blackout period is done, move your tray to a bright spot. Sunflower microgreens light requirements are pretty straightforward — they want bright, indirect light or a grow light running 12 to 16 hours a day. A south-facing windowsill works if the light is strong, but a basic LED grow light gives you more consistency, especially in winter. Direct harsh sunlight can dry them out fast, so indirect is better than blasting them all day.
For watering, bottom watering is the best method at this stage. Pour water into the solid bottom tray and let the soil pull it up through the drainage holes. This keeps the leaves and stems dry, which lowers the risk of mold — something sunflower microgreens can be prone to if the canopy stays wet. Water once a day or when the soil feels dry an inch down.
As for temperature, how warm to grow sunflower microgreens is a common question — aim for anywhere between 65°F and 75°F (18°C to 24°C). Room temperature in most homes is fine. Too cold and germination slows down, too hot and you risk mold and leggy growth.
Step 6 — Growth Timeline
Here’s how long to grow sunflower microgreens from seed to harvest so you know what to expect day by day:
Days 1–2: Seeds are soaking and then planted, nothing visible yet
Days 3–4: Germination happening under the blackout cover, roots establishing
Days 4–5: Pale yellow shoots visible when you lift the cover, move to light
Days 5–8: Greening up fast as chlorophyll kicks in, leaves opening
Days 8–10: Most trays are ready or close — look for fully opened cotyledons and stems standing firm
Days 10–12: Peak harvest window for the best flavor and texture
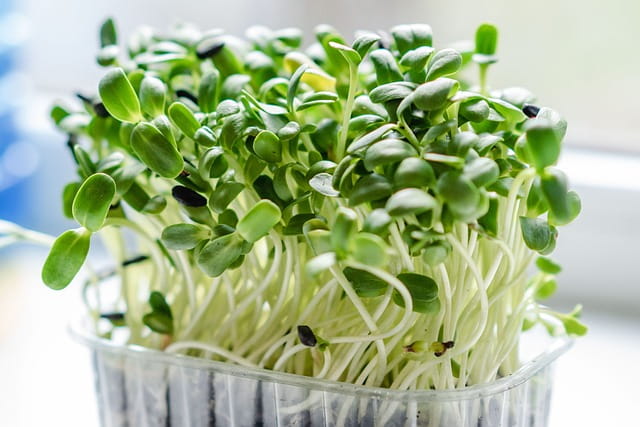
Growing Sunflower Microgreens Without Soil (Hydroponics)
Soil is the most common way to go, but it’s not the only way. Growing sunflower microgreens without soil is totally doable and actually preferred by a lot of home growers who want less mess, easier cleanup, and more control over what goes into their grow.
How It Works
Hydroponic sunflower microgreens are grown on a water-absorbing medium instead of soil — the roots anchor into the mat or pad and draw up moisture from below rather than pulling nutrients from dirt. The seeds still need the same soaking, blackout, and light steps as soil growing. What changes is the base you’re planting into and how you manage moisture.
What to Grow On
The most popular options for growing sunflower microgreens hydroponically are jute mats, burlap pads, and coco mats — coconut coir pressed into flat sheets. Coco mats are probably the most beginner-friendly of the bunch. They hold moisture really well, they’re easy to cut to tray size, and they break down naturally so disposal isn’t a hassle. Jute and burlap work similarly but can dry out a bit faster, so you’ll need to stay on top of watering.
The main thing to watch with any hydroponic setup is that sunflower microgreens are thirsty. The medium needs to stay consistently moist without sitting in standing water, which is where bottom watering still comes in handy even without soil.
Click on any growing material to buy it.
We’ve got a full breakdown of how to grow sunflower microgreens hydroponically — including setup, mat options, and watering schedules — in our detailed Hydroponic Microgreens Growing Guide. Worth a read if you’re thinking about going soil-free long term.
How Long Do Sunflower Microgreens Take to Grow?
The honest answer is somewhere between 7 and 12 days for most growers, but a few things can push that number in either direction. Understanding what affects microgreens growing time sunflower varieties need helps you plan better and troubleshoot faster if something isn’t going the way you expected.
The Basic Timeline
| Growth Stage | Days | What’s Happening |
|---|---|---|
| Soaking | Day 0 | Seeds absorbing water, hull softening |
| Germination (Blackout) | Days 1–4 | Roots establishing, shoots emerging |
| Greening Up | Days 4–6 | Moved to light, chlorophyll developing |
| Active Growth | Days 6–9 | Stems stretching, leaves opening fully |
| Harvest Window | Days 8–12 | Cotyledons open, before true leaves appear |
What Affects How Long to Grow Sunflower Microgreens
Temperature is the biggest factor by far. At the ideal range of 65°F to 75°F, growth moves at a steady, predictable pace. Drop below 60°F and everything slows down noticeably — germination gets sluggish and the tray can take 14 days or more. Too warm above 80°F and you risk mold and weak, leggy stems that fall over before harvest.
Light plays a role too but mostly after the blackout phase. Weak light doesn’t slow germination but it does produce stretched, thin stems that aren’t as satisfying to eat or as nutritious. Strong indirect light or a decent grow light keeps stems thick and upright.
Seed quality and soaking time also matter. Under-soaked seeds germinate unevenly and that throws off your whole tray timeline.
How High Do Sunflower Microgreens Grow
As for how high do sunflower microgreens grow, expect somewhere between 4 and 6 inches by harvest day. Some trays push a little taller depending on light distance and temperature, but if you’re seeing stems stretch past 6 inches before the leaves have fully opened, that’s usually a sign they need more light rather than a sign they’re thriving.
When & How to Harvest Sunflower Microgreens
Knowing when to harvest sunflower microgreens is just as important as knowing how to grow them. Pull them too early and the flavor isn’t fully developed. Wait too long and the stems get tough, the leaves start to yellow, and you’ve missed the best eating window.
When to Harvest
The signal to harvest is simple, look at the leaves. When the cotyledons (the first pair of leaves) are fully open, standing upright, and have turned a deep green, you’re in the harvest window. That usually lines up with days 8 to 12. If you spot the beginnings of a second set of leaves coming through, the true leaves, you’ve hit the outer edge of microgreens harvest time sunflower growers aim for. Not ruined, but cut soon.
One extra tip: hold off on watering the day before you plan to harvest. Drier stems cut cleaner and the microgreens will store a little better after cutting.
How to Harvest
Harvesting sunflower microgreens is straightforward. You need a sharp knife or a pair of clean scissors, dull blades crush the stems instead of cutting them and that speeds up spoilage. Hold a small bunch loosely in one hand and cut just above the soil line in one clean motion. Work across the tray section by section. Rinse gently, spin or pat dry, and they’re ready to eat or store.
Yield
For a standard 10×20 tray, most growers can expect somewhere around 8 to 12 ounces of finished microgreens, though well-managed trays with dense planting can push higher. In terms of how many pounds per tray sunflower microgreens produce, you’re typically looking at just under one pound per tray on a good grow. Microgreens sunflower yield per tray varies based on seed density, growing conditions, and how close to the soil you cut, but that range is a reliable baseline to plan around.
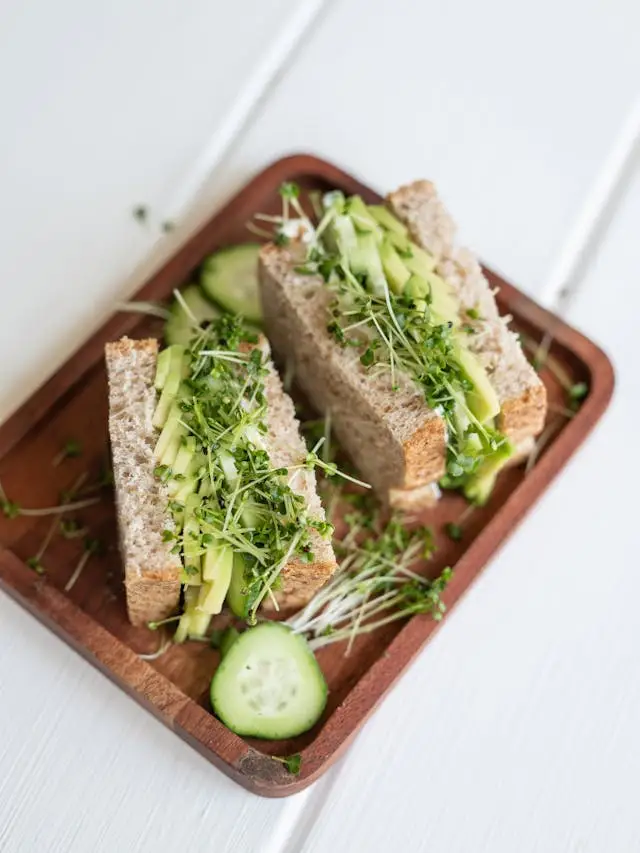
How to Eat Sunflower Microgreens
Once you’ve harvested your tray, the best part starts. Sunflower microgreens have a mild, nutty flavor with a satisfying crunch that makes them genuinely versatile, they’re not one of those health foods you have to choke down. They actually taste good, which is probably why how to eat sunflower microgreens is one of the most searched questions after people grow their first tray.
Simple Ways to Use Them Link
The easiest starting point is a sunflower microgreens salad, toss them in as the base or mix them with other greens. They hold up better than most microgreens so they don’t wilt the second dressing hits them. Beyond salads, here’s where they work really well:
- Layered into sandwiches and wraps instead of lettuce
- Piled on top of avocado toast
- Added to grain bowls and Buddha bowls right before serving
- Blended into smoothies for a nutrition boost without much flavor change
- Used as a garnish on soups, eggs, or flatbreads
- Mixed into coleslaws for extra crunch
A Note on Cooking
Sunflower microgreen recipes almost always use them raw and for good reason, heat kills the nutrients and the texture goes soft fast. Add them at the very end if a recipe calls for any warmth, or just keep them fresh and cold.
Sunflower Microgreens Nutrition & Benefits
Sunflower microgreens aren’t just easy to grow and good to eat, the nutritional value of sunflower microgreens is genuinely impressive for something you can harvest in under two weeks. This is just a quick overview though, because there’s a lot more to cover than fits here.
What’s Inside
Sunflower microgreens nutrition is built around a few standout qualities. They’re rich in vitamins B, C, D, and E, a combination that covers energy, immunity, and skin health all at once. They also contain meaningful amounts of minerals like calcium, iron, magnesium, and zinc. And unlike a lot of greens that are mostly water and fiber, protein in sunflower microgreens is notably higher than most other microgreen varieties, making them a genuinely useful addition to plant-heavy diets.
| Nutrient | Type | Why It Matters |
|---|---|---|
| Vitamin B complex | Vitamin | Energy production, nerve function |
| Vitamin C | Vitamin | Immune support, collagen production |
| Vitamin D | Vitamin | Bone health, mood regulation |
| Vitamin E | Vitamin | Skin health, antioxidant protection |
| Calcium | Mineral | Bone and teeth strength |
| Iron | Mineral | Oxygen transport, energy levels |
| Magnesium | Mineral | Muscle function, sleep quality |
| Zinc | Mineral | Immune defense, wound healing |
| Protein | Macronutrient | Muscle repair, satiety, plant-based diet support |
| Dietary Fiber | Macronutrient | Gut health, digestion |
Health Benefits at a Glance
The health benefits of sunflower microgreens come down to a few key things, they’re anti-inflammatory, they support healthy cholesterol levels, and the vitamin E content in particular is great for skin. The fact that they’re eaten raw means none of those nutrients get cooked off. And because they’re dense and crunchy rather than leafy and soft, they actually fill a different role on a plate than most greens do.
Sunflower microgreens benefits go deeper than what fits in a summary section though. For the full breakdown of what’s actually in them and what the research says, check out our Complete Sunflower Microgreens Nutrition Guide. And if you want to understand how those nutrients translate into real health outcomes, we’ve covered that in detail in our 7 Surprising Benefits of Sunflower Microgreens You Need to Know.
Common Problems (Mold, Fungus & Pests)
Every grower runs into problems at some point, and sunflower microgreens are a little more prone to mold than some other varieties just because of how dense the canopy gets. The good news is most issues have a simple fix once you know what’s causing them.
Mold from Overwatering
This is the most common complaint by far, mold keeps growing in sunflower microgreens and the culprit is almost always too much moisture. Overwatering combined with poor airflow creates exactly the conditions mold loves. The fix is to switch to bottom watering if you haven’t already, water less frequently, and make sure there’s some air movement around your tray. A small fan running on low nearby makes a noticeable difference. Also let the soil surface dry slightly between waterings rather than keeping it constantly wet.
Fungus on Seeds
Fungus on sunflower microgreen seeds usually shows up during the blackout phase and looks like white fuzzy growth at the base of the stems. This is often root hair, which is totally normal and not actually mold, it disappears once the tray hits light and airflow. Actual fungus is darker, slimy, and smells off. The main cause is dirty seeds or seeds that weren’t rinsed properly after soaking. Always rinse thoroughly before planting and make sure your trays are clean between grows.
Mildew & Other Issues
Mildew on sunflower seeds microgreens is less common but shows up in humid environments with poor ventilation. Same fix as mold, more airflow, less surface moisture, bottom watering only.
As for microgreens sunflower worms or other pests, these are rare indoors but not impossible. Fungus gnats are the most likely culprit and they come from soil that stays too wet for too long. Letting the top layer of soil dry out between waterings is usually enough to stop them.
| Problem | Likely Cause | Quick Fix |
|---|---|---|
| White fuzz on stems | Root hair or mold | Expose to light and airflow, check smell |
| Mold on soil surface | Overwatering | Switch to bottom watering, improve airflow |
| Fungus on seeds | Dirty seeds or poor rinsing | Rinse seeds well, clean trays between grows |
| Mildew on leaves | High humidity, poor ventilation | Add a fan, reduce surface watering |
| Fungus gnats | Constantly wet soil | Let topsoil dry between waterings |
| Yellow or leggy stems | Not enough light | Move closer to light source or upgrade grow light |
For a deeper dive into diagnosing and fixing everything that can go wrong with a microgreen tray, head to our Complete Microgreens Troubleshooting Guide — it covers mold, pests, poor germination, and more in full detail.
Tips for Better Growth
These microgreen sunflower tips are the kind of things you pick up after a few grows, small adjustments that make a real difference in the quality and consistency of your trays. The best way to grow sunflower microgreens isn’t about doing anything complicated, it’s about getting the basics consistently right.
- Don’t overwater. This is the number one mistake beginners make. Soggy soil invites mold and weakens roots. Bottom water once a day and let the medium do its job.
- Use good seeds. Cheap or old seeds mean poor germination rates and patchy trays. Spend a little more on untreated, food-grade black oil sunflower seeds and your results will show it.
- Soak every time. Even if you’re in a rush, don’t skip the soak. Eight hours minimum. It genuinely changes how even your germination is across the whole tray.
- Keep air moving. A small fan on low is one of the cheapest upgrades you can make to your setup. It reduces mold risk and strengthens stems at the same time.
- Press seeds into the soil. Good seed-to-soil contact at planting makes a bigger difference than most people expect. Don’t just scatter and mist, press down firmly and evenly.
- Keep temperatures steady. Fluctuating temps stress the plants and slow growth. Aim for 65°F to 75°F and keep your tray away from cold windows or hot vents.
- Harvest at the right time. Don’t let them go too long. Once the cotyledons are fully open and deep green, cut them. Waiting for them to get bigger usually just means tougher stems and lower quality.
- Clean your trays between grows. Old soil and residue harbor bacteria and mold spores. A quick wash with diluted hydrogen peroxide between batches keeps your setup fresh.
Ready to Grow Your First Tray?
Growing sunflower microgreens is one of those things that sounds more complicated than it actually is. You’ve now got everything you need, the right seeds, the right steps, and a clear picture of what to expect from day one to harvest day. The only thing left is to actually do it.
Start simple. One tray, a bag of black oil sunflower seeds, and a bright spot in your home is genuinely all it takes. You don’t need a grow room, expensive equipment, or a green thumb. Most people are surprised by how satisfying it is to go from seed to table in under two weeks, and even more surprised by how good a handful of fresh homegrown microgreens tastes on something as simple as avocado toast or a sandwich.
Once you’ve done one tray of growing sunflower microgreens, you’ll want to do another. And then you’ll probably start eyeing other varieties. That’s just how it goes. But sunflowers are a great place to start, reliable, fast, nutritious, and rewarding in a way that makes the whole process feel worth it from the very first harvest.
And if you’ve already grown your first tray and you’re ready to try something new, broccoli microgreens are the natural next step. Different flavor, different nutrition profile, and a whole new grow to learn. Check out our Complete Guide to Growing Broccoli Microgreens and keep the momentum going.
Frequently Asked Questions
Are sunflower microgreens good for you?
Yes, genuinely. They’re packed with vitamins B, C, D, and E, contain more protein than most other microgreen varieties, and deliver a solid range of minerals including iron, magnesium, and zinc.
Are sunflower microgreens easy to grow?
They’re one of the more beginner-friendly options out there, yes. The seeds are large and easy to handle, germination is fast and reliable when you soak them properly, and the whole process from seed to harvest takes less than two weeks.
How long do sunflower microgreens take?
Most trays are ready to harvest somewhere between 7 and 12 days depending on temperature, light, and seed quality. The sweet spot for flavor and texture is usually right around days 8 to 10 when the cotyledons are fully open and deep green.
Can I grow sunflower microgreens without soil?
Yes, and it works really well. Coco mats, jute pads, and burlap are all popular alternatives. The growing process is almost identical — same soaking, same blackout period, same light requirements. The main difference is how you manage moisture since the mats dry out differently than soil does.
Are sunflower microgreens safe to eat raw?
Completely. They’re actually best eaten raw since heat breaks down the nutrients and softens the texture. Just give them a gentle rinse before eating and make sure you grew them with untreated, food-grade seeds and clean trays.
Do I need to soak sunflower seeds for microgreens?
Technically you can skip it, but you really shouldn’t, especially as a beginner. Soaking for 8 to 12 hours softens the hull, speeds up germination, and gives you a much more even tray. Just soak them overnight and you’re good to go.
How many sunflowers will grow from one seed?
Just one — each sunflower seed produces a single seedling. That’s why seed density at planting matters.