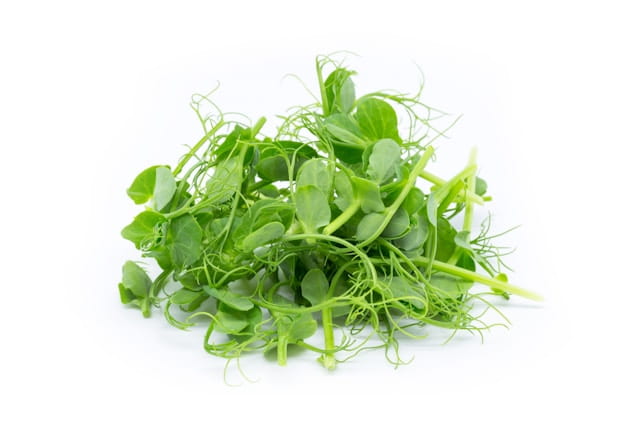
If you’ve ever looked at a bag of pea shoots at the grocery store and thought “I could grow these myself,” you’re right and faster than you’d expect. Learning how to grow pea shoot microgreens indoors takes almost no equipment, no garden, and no experience. Just seeds, a tray, and about ten days. Pea shoot microgreens are one of the most beginner-friendly crops you can start at home, and they’re genuinely worth eating: sweet, tender, and packed with nutrition.
The appeal isn’t just the speed. Growing pea shoot microgreens indoors means you control the whole process, no pesticides, no wondering how old the produce is, no waste from a bunch you half-used. A single tray fits on a windowsill and keeps producing long enough to make the effort worth it.
This post walks you through the whole process, from soaking your seeds to cutting your first harvest. By the end, you’ll know exactly what to do, what to skip, and what actually matters when it comes to pea shoot microgreens growing indoors.

In This Article
| Common Name | Pea shoot microgreens, pea sprouts |
|---|---|
| Botanical Name | Pisum sativum |
| Family | Fabaceae |
| Plant Type | Annual |
| Harvest Size | 3–6 inches tall |
| Sun Exposure | Full sun to partial shade |
| Soil Type | Well-drained, light potting mix or grow medium |
| Soil pH | 6.0–7.0 |
| Hardiness Zones | Grown indoors year-round |
| Native Areas | Mediterranean, Central Asia |
| Toxicity | Non-toxic to humans and pets |
Are pea shoots sprouts or microgreens?
Short Answer: Pea shoots are microgreens, not sprouts — though the confusion is understandable.
Sprouts are germinated seeds eaten whole, roots and all, after just 2–4 days. They never see soil or light. You grow them in a jar with water, rinse them twice a day, and harvest everything including the seed casing. Because there’s no drainage and constant moisture, they carry a higher risk of bacterial growth if not handled carefully.
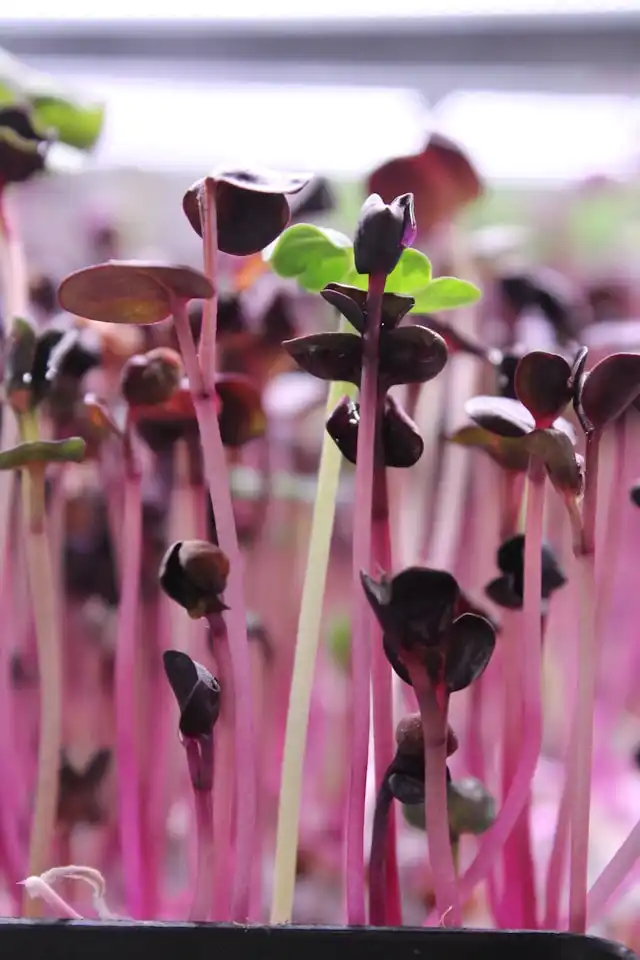
Microgreens are the next stage. You plant them in a growing medium, let them develop their first true leaves, then cut them just above the soil line, roots stay behind. Pea shoot microgreens fit here: grown in a tray, harvested at 3–6 inches tall, around day 8–12. You eat the stem and leaves only.
Full pea shoots (sometimes sold at farmers markets) are the same plant grown even longer, 4 to 6 weeks, with multiple leaf sets and tendrils. More fibrous, better for stir-fries than salads.
So when someone says “pea sprouts” in a recipe, they usually mean microgreens. The terms get used interchangeably in grocery stores, which doesn’t help. But if you’re growing at home, the distinction matters: sprouts need a jar, microgreens need a tray.
Choosing your seeds — varieties & what to look for
Seed choice matters more than most beginners expect. The variety you pick affects flavor, color, germination rate, and how fast the tray fills in, and not all pea seeds sold for gardening are worth using for microgreens.
Which varieties actually work
The most common options you’ll find when shopping for pea shoot microgreen seeds:
Green pea shoots
Green pea shoots (field pea or garden pea) are the standard. Mild, sweet, fast to germinate. If you’re growing for the first time, start here. They’re forgiving, dense, and most seed suppliers stock them in bulk.
Buy Here: https://amzn.to/4thqWfp
Sugar Snap Pea Shoots Microgreens
Sugar snap pea shoots microgreens come from sugar snap varieties and tend to have a slightly sweeter flavor with a thicker stem. They take a day or two longer to fill in but hold up better after cutting, which matters if you’re not eating the whole tray at once.
Buy Here: https://amzn.to/4el2Yfm
Snow pea shoots
Snow pea shoots sit somewhere between the two — delicate leaves, tender stems, good raw. Popular in Asian cooking and worth trying once you’ve done a basic green pea tray.
Buy Here: https://amzn.to/4tgKb8X
Gold Pea Shoots Microgreens
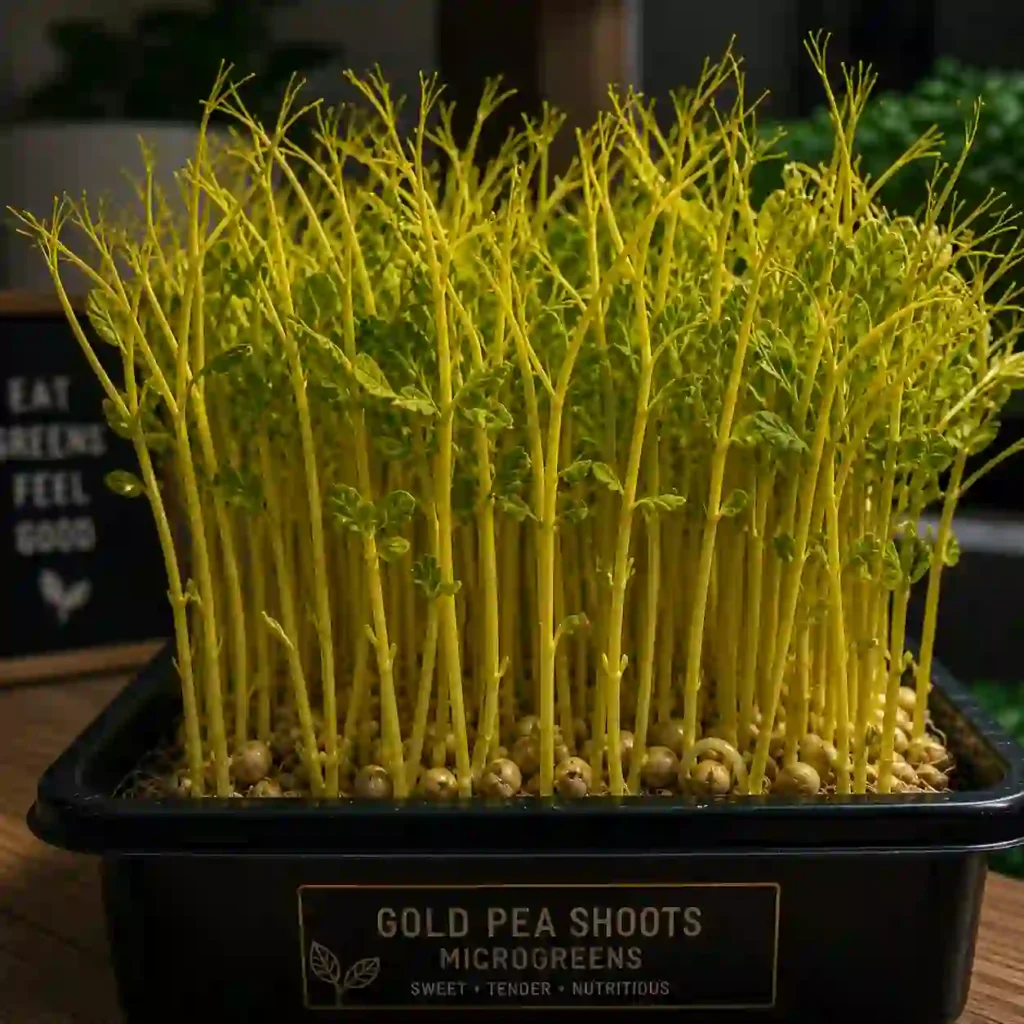
Gold pea shoots microgreens are less common but genuinely interesting. They grow pale yellow instead of green due to lower chlorophyll development, with a milder, slightly nuttier taste. Good for plating contrast if you care about presentation.
What to look for in a seed
Not all pea seeds are equal for microgreens use. A few things worth checking before you buy:
- Untreated only. Garden seeds are sometimes coated with fungicides. You’ll be eating these at 10 days old, skip anything treated.
- High germination rate. Look for 90%+ on the label or product listing. Low germination means patchy trays and wasted medium.
- Whole seeds, not cracked. Cracked seeds rot before they sprout. Bulk bags from reputable microgreen suppliers are usually cleaner than generic garden packets.
- Seed weight per tray. For a 10×20 tray, you need roughly 200–250g of pea seeds. Buy accordingly, small garden packets won’t cut it if you’re growing regularly.
If you’re not sure whether to buy special seeds for pea shoots or use the same seeds, that are used for growing pea plants, check out our seed buying guide.
Short answer: Buy special seeds
| Variety | Flavor | Color | Germination | Best For |
|---|---|---|---|---|
| Green / Field Pea | Sweet, mild | Deep green | 1–2 days | Beginners, bulk growing |
| Sugar Snap | Sweeter, thicker stem | Bright green | 2–3 days | Longer shelf life after cut |
| Snow Pea | Delicate, tender | Light green | 2–3 days | Raw eating, Asian dishes |
| Gold Pea | Mild, slightly nutty | Yellow-gold | 2–3 days | Presentation, variety |
What you need — growing kit & supplies
You don’t need much to get started. A basic pea shoot microgreens indoor tray setup costs less than $30, and most of it you’ll reuse indefinitely. Here’s what actually matters.
Trays
You need two: one with drainage holes (your growing tray) and one without (your bottom tray for watering). The standard size is 10×20 inches. This is your pea shoot microgreens growing tray, the holed one holds the medium and seeds, the solid one catches water when you bottom-water later in the grow. Buying them as a pair saves you from improvising with whatever’s in the kitchen.
Buy Here: https://amzn.to/42KO5fe
Growing medium
Coco coir is the go-to for pea shoots. It’s light, drains well, holds enough moisture, and doesn’t compact. Plain potting mix works too, but avoid anything with heavy fertilizer added, at 10 days, the seeds feed themselves and extra nutrients can cause problems. Fill your tray about an inch deep.
Grow lights
A sunny south-facing windowsill can work, but it’s inconsistent. Pea shoot microgreens lighting doesn’t need to be expensive, a basic LED grow light on a 12–16 hour timer gives you predictable results regardless of season or which direction your windows face. If you’re growing year-round, a light pays for itself quickly.
As microgreens don’t need as much light as a full grown plant, these low watt grow lights work best, without burning your greens: https://amzn.to/4cLlOeu
Spray bottle
Used for the first few days before you switch to bottom watering. A simple one works fine. You want a fine mist, not a jet that dislodges seeds.
Weight or second tray
Pea seeds need pressure during germination, it helps them shed their hulls and root down properly. Stack a second tray on top and weight it down with something heavy: a book, a brick, a full water bottle. This step makes a real difference in how even and upright your shoots come up.
Anything else?
Not really. A spray bottle, two trays, coco coir, and something heavy covers 90% of what you need. If you’d rather not source each piece separately, a pea shoots microgreens growing kit bundles the essentials together and gets you started without the guesswork, worth considering for a first grow.
As a beginner these growing kits are a life saver, as they come with everything you need for growing microgreens, and these are especially made for pea shoots growing: https://amzn.to/4uqzzoQ
How to grow pea shoot microgreens — step by step
Growing pea shoot microgreens is straightforward once you know the sequence. The whole process takes around 10 days, and most of that time the tray is doing the work without you. Here’s exactly how it goes.
Step 1: Soak your seeds (Day 0) — 8–12 hours
Put your pea seeds in a bowl and cover with room temperature water. They’ll swell noticeably, that’s the point. Soaking cuts germination time by a day or two and improves evenness across the tray. Drain and rinse before planting. Don’t skip this step. Check out our seed preparation guide to maximize germination.
Step 2: Prepare your tray (Day 0)
Fill your drainage tray with about an inch of coco coir or potting mix. Press it down lightly so the surface is level, uneven medium means uneven growth. Moisten it thoroughly before seeding. It should feel damp throughout, not soggy, not dry.
Step 3: Sow at the right density (Day 0)
Spread your soaked seeds in a single, even layer across the surface. Good planting density for pea shoot microgreens is roughly 200–250g per 10×20 tray, seeds touching but not piled on top of each other. Too sparse and you get patchy coverage. Too thick and airflow suffers, which invites mold. Give the seeds a light press into the medium with your hand or a spare tray base.
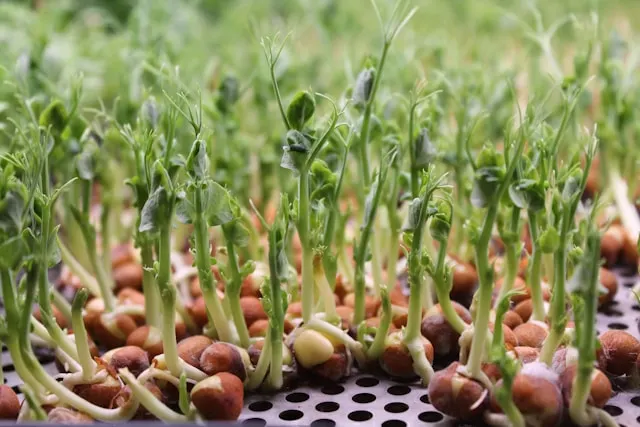
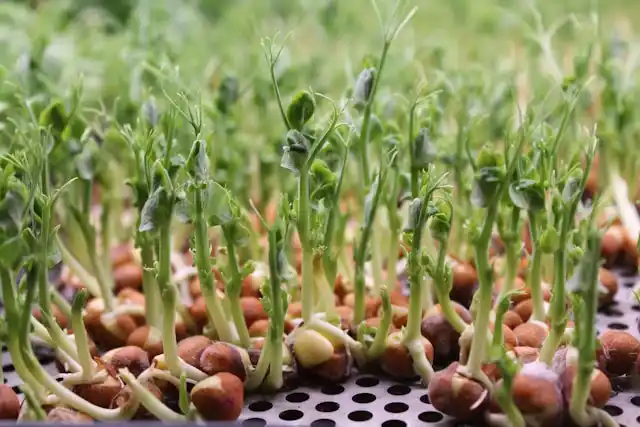
Step 4: Blackout and germination (Days 1–4)
Stack a second tray on top and weigh it down. Put the whole setup somewhere dark, a cupboard, a corner, under a table. This is your blackout phase. The pressure helps roots anchor and pushes the seeds to shed their hulls. Check once a day and mist lightly if the surface looks dry. By day 3 or 4, you’ll see pale yellow shoots pushing up against the top tray.
Step 5: Move to light (Day 4–5)
Once shoots are about an inch tall and clearly established, remove the weight and top tray and move them under your grow light or onto a bright windowsill. Pea shoot microgreens lighting at this stage should be 12–16 hours per day. The shoots green up within 24 hours of light exposure, you’ll notice the color change fast.
Step 6: Water from the bottom (Days 4–10)
Stop misting. Pour water directly into the solid bottom tray and let the growing medium absorb it from underneath. This keeps the leaves dry and dramatically reduces the chance of mold. Check once or twice a day, pea shoots drink a lot. Let the bottom tray go almost dry before refilling rather than keeping it constantly flooded.
Step 7: Watch for microgreens pea shoots short shoots
If your shoots are coming in short and stubby, it’s usually one of two things: not enough light, or the blackout phase ended too early. Pea shoots want to stretch toward light. that’s normal and good. If they’re pale and thin after day 5, they need more hours under the light or a stronger source.
Grow timeline at a glance
| Day | What’s Happening |
|---|---|
| 0 | Soak seeds 8–12 hrs, prep and seed tray |
| 1–3 | Blackout, seeds germinating underground |
| 4 | Shoots visible, remove weight, move to light |
| 5–7 | Rapid green-up, bottom water daily |
| 8–10 | Full-size shoots, ready to harvest |
The grow time for pea shoots microgreens sits reliably at 8–10 days in most indoor conditions. Cooler rooms slow things down by a day or two. Warmer rooms (above 75.2°F) can speed germination but also increase mold risk, so keep an eye on airflow if your space runs warm.
When & How to Harvest Pea Shoot Microgreens
Harvest too early and you leave flavor on the table. Wait too long and the stems get fibrous and the leaves toughen up. There’s a window of about 2–3 days where pea shoots are at their best, and once you’ve seen it once, you’ll recognize it every time.

What a ready tray looks like
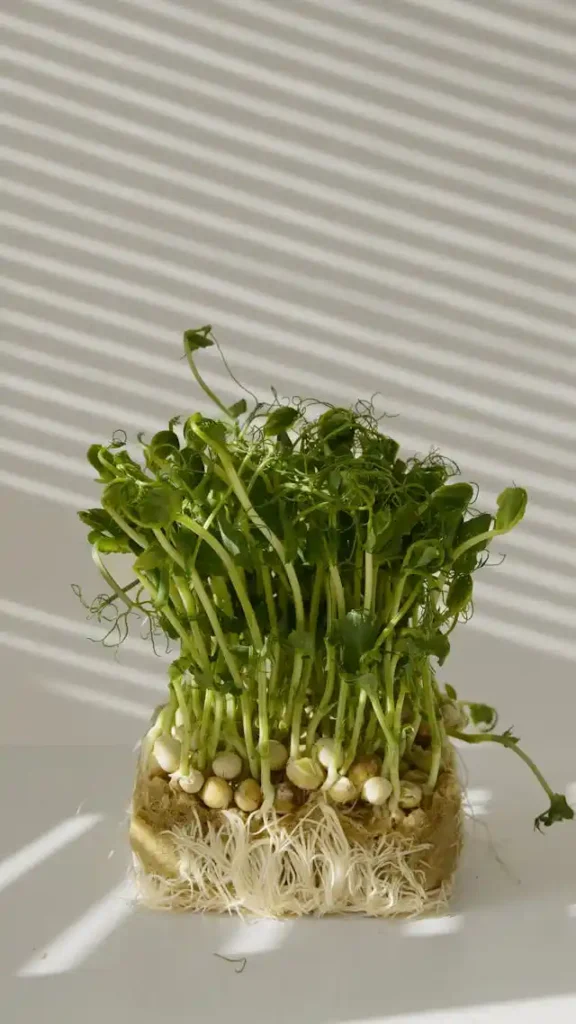
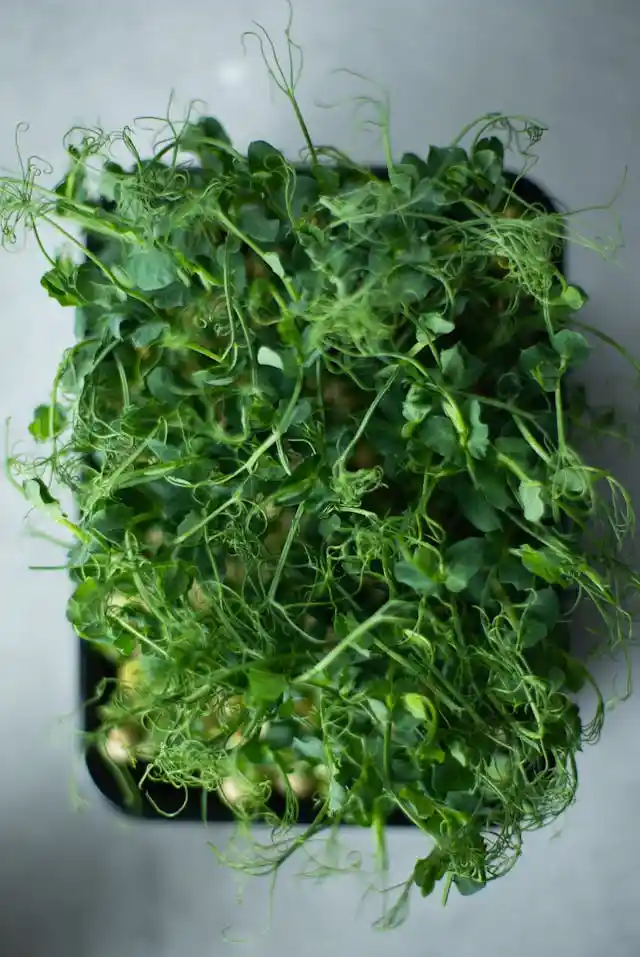
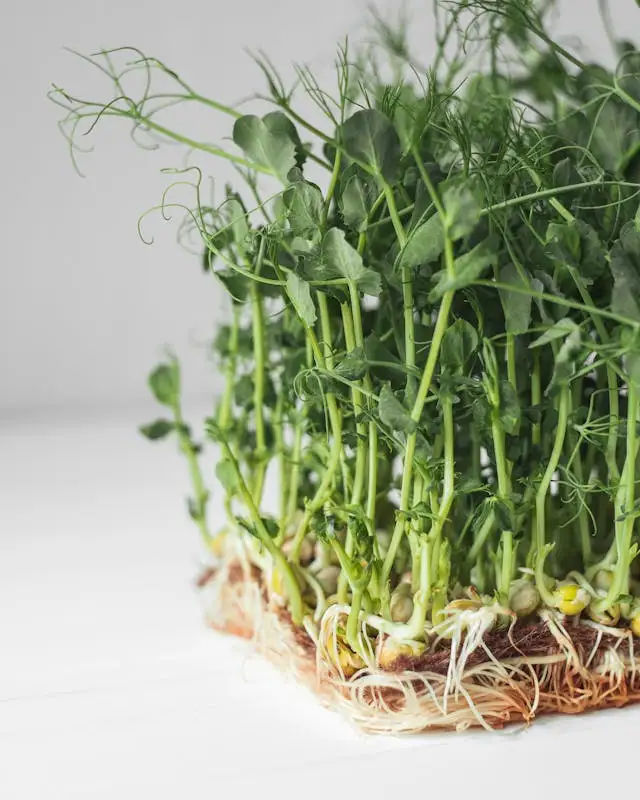
A good pea shoot microgreens tray harvest is pretty obvious visually. You’re looking for:
- Shoots standing 3–5 inches tall with the stem upright and firm
- The first pair of true leaves fully open and deep green
- Tendrils starting to appear, those small curling tips are the clearest sign the plant is at peak growth
- A dense tray where shoots are touching each other across the whole surface
A pea shoot microgreens dense tray harvest means even coverage with no major bare patches. If a corner is still short, give it another day. The rest of the tray won’t suffer for waiting 24 hours.
When to cut
Days 8–10 for most grows, but go by what you see rather than the calendar. Tendrils visible plus 3–5 inch height is your real signal. Once the second set of leaves starts opening, flavor starts to peak, that’s your window.
How to harvest
Use clean, sharp scissors. Hold a pea shoot microgreens harvest handful in one hand and cut just above the soil line, you want stem and leaves, not growing medium. Work across the tray in sections rather than grabbing randomly. One full 10×20 tray gives you a generous amount, usually 150–200g of fresh pea shoot microgreens depending on density and variety.
Don’t wash before storing. Moisture on the cut stems shortens shelf life fast.
Storage
Pat the cut shoots dry if there’s any surface moisture, then store in an airtight container lined with a dry paper towel. They keep well in the fridge for 5–7 days. The paper towel absorbs excess moisture and stops them going slimy. Check every couple of days and swap it out if it gets wet.
Can you get a second harvest?
Sometimes, but don’t count on it. Pea shoots can regrow after cutting if you leave enough stem and the roots are healthy. The second cut usually comes in thinner, shorter, and less flavorful than the first. Most growers compost the tray after the first harvest and start fresh, it takes the same 10 days and gives you a much better result than nursing a second cut from a spent tray.
If you want a continuous supply, stagger your trays by 3–4 days. By the time you finish one harvest, the next tray is almost ready.
Nutrition & health benefits
Pea shoots punch well above their size nutritionally. For something you harvest at 10 days old, the concentration of vitamins and minerals is genuinely impressive — significantly higher per gram than mature peas in several categories. They’re high in vitamins A, C, and K, contain useful amounts of folate and plant-based protein, and provide fiber in a form your body absorbs easily. If you’re adding microgreens to your diet for health reasons, pea shoots are one of the better places to start.
| Nutrient | Per 100g (approx.) | Why It Matters |
|---|---|---|
| Vitamin A | 1,500–2,000 IU | Eye health, immune function |
| Vitamin C | 35–40mg | Antioxidant, collagen production |
| Vitamin K | 40–50mcg | Blood clotting, bone health |
| Folate (B9) | 100–120mcg | Cell repair, essential during pregnancy |
| Protein | 3–4g | Muscle repair, satiety |
| Fiber | 1.5–2g | Gut health, blood sugar regulation |
| Iron | 1–1.5mg | Oxygen transport, energy |
Pea shoot microgreens are also low in calories, which makes the nutrient density even more useful — you’re getting a lot of nutritional value without much volume.
For a full breakdown of the research behind these numbers, how pea shoots compare to other popular microgreens, and what the science actually says about bioavailability, check out our dedicated post: Pea Shoot Microgreens Nutrition: What’s Really In Your Tray.
How to Use & Eat Pea Shoot Microgreens
Pea shoots have a clean, sweet flavor with a faint grassiness that works in more places than you’d expect. They’re not sharp like radish microgreens or bitter like some brassicas, they taste like a concentrated version of fresh peas, which makes them easy to pair and hard to mess up.
The most obvious use is as a pea shoot microgreens salad topping. Scatter a handful over dressed greens right before serving and they add texture, color, and flavor without overpowering anything. They hold up better than delicate herbs but wilt fast once dressed, so add them last.
Beyond salads, here’s what to do with pea shoot microgreens:
- Sandwiches and wraps — swap out lettuce for a layer of pea shoots. They add crunch and freshness without the bulk.
- Grain bowls — pile them on top of warm farro, quinoa, or rice. The heat wilts them slightly, which is fine.
- Soups — use as a garnish on bowl of ramen, miso, or any light broth. Add after ladling, not during cooking.
- Stir-fries — toss in at the very end, off the heat. Thirty seconds is enough. Any longer and they lose their texture.
- Eggs — folded into an omelette or scattered over scrambled eggs, they work surprisingly well.
For pairings, pea shoots go well with lemon, sesame, garlic, avocado, and anything with a salty or umami base. A simple microgreen pea shoot recipe that never fails: olive oil, lemon juice, flaky salt, and a handful of shoots over whatever protein you’re already making.
Don’t know what to make, check out these 14 pea shoot microgreen recipes.
Common Problems & Quick Fixes
Most pea shoot problems trace back to these common problems: moisture, airflow, or light, and most are fixable before they kill the tray.
- Mold — Caused by too much surface moisture and not enough airflow, especially during the blackout phase. If pea shoots microgreens already have mold, remove the affected seeds immediately, improve ventilation with a small fan, and switch to bottom watering only going forward.
- Yellowing — Microgreens pea shoot yellow is almost always a light problem. Move the tray closer to your grow light or window; yellow pea shoots microgreen growth usually greens up within 24 hours of proper light exposure.
- Leggy shoots — Long, floppy stems that can’t support themselves mean the light source is too far away or too weak. Lower your grow light or move to a brighter spot; leggy shoots won’t fully recover but new growth comes in stronger.
- Poor germination — Uneven or sparse sprouting usually comes from dry medium, old seeds, or skipping the presoak. Check germination rate on your seed batch and soak for a full 8–12 hours next time.
- Damping off — Stems thin out and collapse at the soil line, which is a fungal issue triggered by overwatering and poor drainage. Let the medium dry slightly between waterings and make sure your tray has proper drainage holes.
Frequently Asked Questions
How long do pea shoot microgreens take to grow?
Pea shoot microgreens take 8–10 days from seed to harvest indoors. Cooler rooms can push this to 12 days; warmer conditions bring it closer to 7.
Can I grow pea shoots at home?
Yes, easily. You need two trays, some coco coir, seeds, and a bright windowsill or basic grow light. No garden, no special skills required.
Can I grow pea shoots without soil?
Yes — pea shoots grow well hydroponically on a damp grow mat or jute pad. It’s cleaner, faster to set up, and works well for repeat growing. Full details in our guide: How to Grow Microgreens Hydroponically
Can you grow pea shoots in winter?
Yes. Growing indoors means season doesn’t matter much. A grow light handles the shorter days, and as long as your space stays above 10°C, germination and growth stay on schedule.
Are pea shoots hard to grow?
No — they’re one of the easiest microgreens for beginners. Large seeds, fast germination, and forgiving growing conditions make them a reliable first crop.
Are pea sprouts low in histamine?
Pea shoots are generally considered low-histamine compared to fermented or aged foods, but individual reactions vary. If you’re managing a histamine intolerance, speak with a dietitian before adding new foods to your diet.
Are pea shoots ok to eat raw?
Yes. Raw pea shoots are sweet, tender, and commonly eaten fresh in salads, sandwiches, and bowls. Just rinse before eating and consume within a week of harvest.
Do pea microgreens need to be soaked?
Soaking isn’t strictly required, but it’s worth doing. An 8–12 hour presoak speeds up germination by a day or two and improves evenness across the tray.
Are pea shoots high in iron?
Pea shoots contain iron, but are not exceptionally high in it compared to other iron-rich foods. They contribute to overall intake as part of a varied diet. If iron levels are a health concern for you, a doctor or registered dietitian can give you accurate guidance based on your situation.
Can diabetics eat pea shoots?
Pea shoots are low in carbohydrates and have a low glycemic impact, which is generally favorable. That said, dietary needs vary significantly between individuals, so check with your healthcare provider about what works for your specific situation.