Mold on sunflower microgreens is one of the most stubborn problems a grower can face. And the worst part isn’t the first outbreak, it’s treating it, thinking you’ve fixed it, then walking back to your tray two days later to find it’s worse.
If mold keeps growing in sunflower microgreens even after you’ve tried fixing it, the cause is almost always one of three things: moisture you can’t see, airflow you don’t have, or a seeding mistake that made the tray vulnerable from day one. Most guides tell you to wipe the mold off. That’s not wrong, but it’s not the fix either.
This is the complete guide to problems with indoor sunflower microgreens, mold, fungus on seeds, powdery mildew, worms, maggots, leggy growth, and stuck hulls. If something’s going wrong with your tray right now, it’s in here.
In This Article
Scan this table first. If you see your problem, jump to that section for the full fix.
| Problem | Most Likely Cause | Quick Fix |
|---|---|---|
| Mold on seeds | Hull moisture, poor soaking | H2O2 presoak, space seeds |
| Mold keeps returning | Blackout humidity, top watering | Bottom water, fan after blackout |
| Fungus on seeds | Contaminated seed lot | New seed source, H2O2 soak |
| Mildew on leaves | High humidity, no airflow | Fan, reduce watering |
| Worms/maggots | Fungus gnats, dirty soil | Sterile coco coir, yellow traps |
| Leggy growth | Too long in blackout | Reduce blackout by 12 hours |
| Yellow stems | Insufficient light | Move closer to grow light |
| Red stems | Temperature fluctuation | Stabilize room temp |
| Stuck hulls | No weight in blackout | Add weight, mist hulls lightly |
| Falling over | Underwatering or overseeding | Bottom water, reduce seed density |
Most of these have one root cause that keeps getting missed. The sections below go through each one.
Why Mold on Sunflower Microgreens Is So Much Harder to Stop
Most mold problems in microgreens come down to moisture and airflow. Fix those, mold goes away. Sunflowers follow that rule, they just break it constantly, because of something almost no guide mentions: the hull.
Mold Keeps Growing in Sunflower Microgreens — Here’s the Real Reason
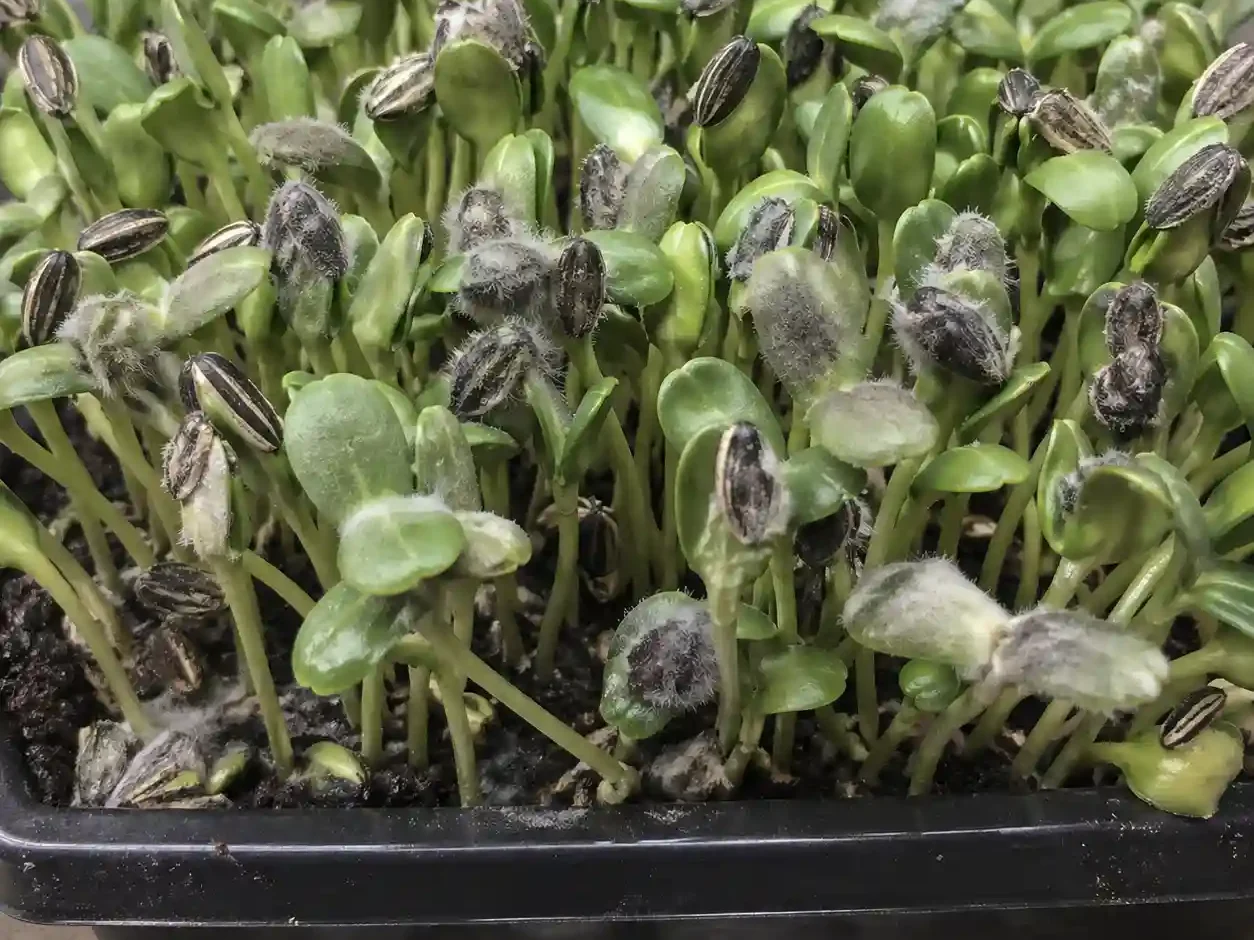
Sunflower seeds have a thick, fibrous hull that stays clamped onto the cotyledon long after germination. It traps moisture in the gap between the seed coat and the emerging leaf, a narrow pocket that stays wet even when your medium’s surface looks dry, even when you’ve cut watering back, even with a fan pointed at the tray. That’s where mold on sunflower microgreens starts. And it’s why it keeps coming back after you treat it.
Radish and broccoli don’t do this. Those seeds shed their coats early and dry out fast at the seed-leaf junction. Sunflower growers deal with recurring mold because the hull physically holds water against the plant. It’s not just a humidity problem, it’s a structural one.
Seeding density makes it worse. You need seeds close together for decent yield, but that spacing creates a microclimate at tray level, still, warm air sitting between plants, that mold is perfectly suited for.
The blackout phase is where it really gets ahead of you. Three or four days of dark, warm, humid conditions is enough for fungus on sunflower microgreen seeds to establish before you’ve seen a thing. Lift the cover and it’s already there on the hulls. Mildew on sunflower seeds microgreens can follow fast once that starts.
Heavy water uptake runs underneath all of it. Sunflowers drink more than lighter seeds, so overwatering mistakes hit harder and stay in the medium longer.
If you’re growing other varieties alongside sunflowers and seeing mold there too, the causes are different, Microgreen Mold Problem: Why It Keeps Coming Back and How to Stop It for Good.
Fungus on Sunflower Microgreen Seeds — What It Looks Like and Why It Starts at the Seed
Growers use fungus, mildew, and mold interchangeably, understandably, because they all look bad and they all show up in the same place. But they behave differently, and treating the wrong one is why the problem keeps coming back.
Here’s what you’re actually looking at:
- Fungus on seeds shows up during soaking or in the first 24–48 hours of germination. It’s a grey or black coating on the hull itself, not root hairs, not condensation. It usually means the seed lot was already compromised before it reached you.
- Mildew on sunflower seeds microgreens looks like a powdery white coating on the hull before the sprout even emerges. The texture is chalky and flat, which is how you tell it apart from the wispy, hair-like look of normal root growth.
- Downy mildew appears later, white, cotton-like patches on the underside of early leaves. It spreads faster than the other two in high humidity and can wipe out a tray quickly once it takes hold.
Checkout this study by MP Seeds on, Fungi in Microgreens: Beneficial and Harmful Fungi Examples.
Why contaminated seeds are the cause most guides skip:
Bad seeds are the starting point for fungus on sunflower microgreen seeds more often than anything else in your setup. A seed lot with poor germination rates, improper storage, or inadequate processing brings pathogens in before you’ve done a single thing wrong. No amount of airflow fixes a contaminated seed.
Check the lot number and germination rate before you commit a full tray. Anything below 90% germination is a risk. If a supplier doesn’t publish that data, that’s the answer.
Pre-treatment that actually works:
- Hydrogen peroxide soak: Mix 1 part 3% H2O2 with 3 parts water. Soak seeds for 10–15 minutes before your normal pre-soak. Rinse thoroughly.
- Diluted vinegar soak: 1 tablespoon white vinegar per cup of water, 10-minute soak, followed by a clean water rinse. Less effective than H2O2 but works in a pinch.
- Skip these if your seeds are already clean and from a trusted source, over-treating healthy seeds can reduce germination rates.
Choosing clean, high-quality seeds is the first line of defense against mold on sunflower microgreens before your tray even gets started, Best Microgreen Seeds to Grow: Ranked, Reviewed and Ready to Buy.
How to Stop Mold on Sunflower Microgreens Before It Kills Your Tray
Most growers treat mold reactively. By the time it’s visible, it’s already had 48 hours to establish. These steps work because they cut off mold’s entry points before it starts and give you a recovery path when it shows up anyway.
Step 1: Pre-soak in hydrogen peroxide
Soak sunflower seeds in a 3% H2O2 solution diluted 1:3 with water for no more than 8–12 hours. Sunflowers absorb water aggressively, beyond 12 hours, you risk splitting hulls and reducing germination. Rinse thoroughly before moving to your tray. This alone eliminates a significant portion of surface pathogens before blackout even begins.
For the full breakdown on soaking times, ratios, and what to do with different seed sizes, Microgreen Seed Preparation: The Complete Guide to Soaking, Sanitizing & Seeding.
Step 2: Space seeds wider than you think you need to
Most guides on sunflower microgreens recommend dense seeding for yield. That advice trades mold risk for harvest weight. Give seeds more room than feels right, they’ll use it, and the airflow between plants during blackout makes a real difference.
Step 3: Manage the blackout phase actively
If humidity in your grow space is high, lift the cover at 48 hours instead of waiting the full 3–4 days. Check the hull surface. If you’re already seeing grey or white growth on the seeds, airflow now is more important than darkness.
Step 4: Bottom water only
Top watering sunflowers pushes moisture directly into the hull-leaf junction, the exact place mold on sunflower microgreens colonizes first. Fill the tray below, let the medium wick up what it needs, and keep the canopy dry. This is the single biggest mistake new growers make and the easiest one to fix.
Step 5: Introduce airflow early
A small fan on low, pointed near the tray rather than directly at it, starting from day two of the blackout phase. You’re not trying to dry the tray out, just keep the air moving enough that moisture doesn’t sit.
Step 6: Pull stuck hulls immediately
Every hull still attached to a cotyledon is a moisture trap. Remove them by hand as soon as the sprout is tall enough to handle. It’s tedious. It’s also one of the most effective things you can do to reduce mold surface area on a tray that’s already showing problems.
The 20% rule
If mold covers less than 20% of your tray and the stems underneath look healthy, the tray is salvageable. Remove affected plants, improve airflow, switch to bottom watering if you haven’t, and hold off on watering for a day.
When to toss it
Smell the tray. Healthy microgreens smell green and slightly nutty. If there’s a sour, ammonia-like, or rotten smell underneath the mold, that’s bacterial contamination moving in behind the fungus. At that point the tray is done. Cut your losses, sanitize everything, and start clean.
Microgreens Sunflower Worms and Maggots — What They Are and How to Get Rid of Them
Finding movement in your tray is a specific kind of horrible. Here’s what you’re actually dealing with and how to handle it.
Worms vs maggots — what you’re looking at
- Fungus gnat larvae are the most common culprit. Tiny, translucent white, hair-thin, found in the top layer of soil or medium. They don’t move much when disturbed, just a slow writhe. These are the microgreens sunflower worms most growers encounter.
- Maggots are thicker, cream or yellow-white, and move more visibly when the tray is disturbed. They come from flies, usually fungus gnats that have matured, or occasionally houseflies if trays have been left uncovered near a window.
- Actual worms are rare indoors. If it’s segmented, darker in color, and moves like a worm, it likely came in with contaminated soil from an outdoor source.
Why sunflower trays get hit harder
Hull debris that falls to the soil surface during germination creates organic matter that fungus gnats actively seek out for egg-laying. Combined with the moisture sunflower trays need, it’s a more attractive target than a broccoli or radish tray sitting nearby.
Where they come from
Contaminated growing medium is the most common entry point, especially potting mixes with compost or bark. Unsterilized trays from previous grows, outdoor air near an open window, and soil tracked in from outside all introduce eggs before you’ve planted a thing.
Treatment
- H2O2 soil drench: Mix 1 part 3% hydrogen peroxide with 4 parts water and water the medium from below. It kills larvae on contact without harming the plants.
- Yellow sticky traps: Place one near the tray immediately. Adult fungus gnats are drawn to yellow, catching them stops the next egg cycle.
- Cover trays properly: During blackout, a loose cover still lets gnats in. Make sure it’s sealed enough to block access.
Prevention
Use sterile coco coir instead of soil-based mixes. Sanitize trays between every batch, not just a rinse, an actual scrub with diluted H2O2 or white vinegar. Keep outdoor soil away from your grow space entirely.
Is the tray salvageable?
It depends on how far along the infestation is. If you caught it early, larvae visible but plants still upright and healthy, drench the medium, trap the adults, and watch it closely. If the roots are damaged and plants are falling over, the tray is done. Pull it, bag the medium, and sanitize everything before the next grow.
Worms and mold often appear together because they share the same root cause, 5 Common Problems Growing Microgreens and What to Do About Them.
Sunflower Microgreens Leggy, Yellow or Falling Over — Causes and Quick Fixes
If your sunflowers shot up spindly and pale, or they’re tipping over before you even get to harvest, you’re not alone. These are fixable problems, but you need to know which one you’re actually dealing with.
Leggy growth almost always comes down to two things: too many days under the blackout dome, or not enough light once you remove the cover. Sunflowers are hungrier for light than most other microgreen varieties. If you’re using the same light setup that works for peas or radishes, it may not cut it here. Move the light closer or increase daily exposure time.
Yellowing after blackout is normal for the first 12–24 hours after you pull the cover. The cotyledons need a bit of time to wake up and start producing chlorophyll. If the yellow fades to green within a day, you’re fine. If yellowing continues past that window, check your light distance and how many hours per day the tray is getting.
Red or purple stems catch a lot of growers off guard. They look alarming, but they’re not a disease. Sunflowers commonly develop red stems when there’s a temperature swing or when they’re picking up more blue-spectrum light. Anthocyanin, the same pigment that turns autumn leaves red, builds up in the stem tissue. It won’t affect flavor or safety.
Falling over is caused by one of two things: underwatering or overseeding. To figure out which, press lightly on the medium. Dry and pulling away from the tray edges? Underwatering. Tray feels fine but the stems look densely packed and weak at the base? You seeded too heavily and the plants are competing for space and support.
Uneven germination across the tray, thick in the center, thin at the edges, usually means uneven pressure during the blackout phase. A weighted tray on top solves this. The seeds need consistent contact with the medium to germinate at the same rate.
Slow or no germination is almost always a temperature problem. Below 65°F, sunflower seeds stall. They don’t fail, they just wait. Get the tray somewhere warmer and they’ll typically catch up within a day or two.
Getting your setup right from day one prevents most of these problems, How to Grow Sunflower Microgreens: The Complete Growing Guide.
Sunflower Microgreen Hulls Stuck on Leaves — Why It Happens and How to Remove Them
Sunflowers have the worst hull-shedding problem of any microgreen variety. The seed coat is thick, the grip is strong, and if you don’t address the root cause during germination, you’ll spend harvest day picking hulls off by hand. Here’s what’s actually going on and how to deal with it.
Why sunflowers struggle to shed hulls more than other varieties
- The seed coat is dense and clings tightly to the cotyledon as it unfolds
- Unlike smaller seeds that push through medium and shed naturally, sunflower hulls often ride up with the seedling still attached
The two causes behind stuck hulls
- Not enough weight during blackout — the seed needs downward resistance to shed the hull as it pushes up; without it, the hull just comes along for the ride
- Seeds planted hull-side up — orientation matters; hull-side down gives the seedling the mechanical advantage it needs to break free on its own
How to loosen stuck hulls without damaging the plant
- Lightly mist the hulls with water and wait 10–15 minutes, moisture softens the grip without making the stems wet enough to rot
- Pinch the hull gently between two fingers and rock it side to side rather than pulling straight up
- If it doesn’t release easily, mist again and come back, forcing it snaps stems
Why it’s worth dealing with, not just ignoring
- Stuck hulls trap moisture against the cotyledon surface
- That trapped moisture becomes a mold point, which matters a lot if you’ve already had mold issues in the tray
- Hulls also block the leaf from fully opening, which affects both yield and presentation
When to harvest for the easiest hull removal
- Sunflowers shed hulls most naturally when the cotyledons are fully open and standing upright, usually around day 8–10 depending on temperature
- Harvesting slightly later than you think you need to (one extra day) often means the hulls fall away on their own
Want to know the full nutritional value you’re protecting by harvesting correctly, Sunflower Microgreens: Full Nutritional Breakdown and Health Benefits.
Frequently Asked Questions
Why do my microgreens have mold?
Mold in microgreens is almost always caused by poor airflow, overwatering, or seeding too densely. The combination of moisture and stagnant air is what mold needs to take hold. Fix ventilation first, then dial back watering.
Can mold grow on sunflower seeds?
Yes. Sunflower seeds can carry mold spores before they even go into the tray. Pre-soaking in a diluted hydrogen peroxide solution (3% H₂O₂, 1 part to 3 parts water) kills surface spores before germination starts.
Is it safe to eat moldy microgreens?
No. Discard any tray with visible mold on the greens themselves. True mold on the plant can carry mycotoxins. White fuzz on the medium near the roots is usually root hairs and is safe — but mold on stems or leaves is not.
Why did my sunflowers get moldy?
Sunflowers are high-moisture seeds that need soaking before planting — which makes them more mold-prone than most varieties. The most common triggers are bottom watering stopped too early, a blocked drainage tray, or hulls trapping moisture against the stems.
Why does mold keep coming back even after I treat it?
Because the source wasn’t eliminated — only the visible growth was. Recurring mold usually means spores are living in your trays, medium, or growing surface. Soak equipment in a hydrogen peroxide solution between grows, switch to a fresh medium, and check that airflow hasn’t been blocked.
Are worms or maggots in sunflower microgreens dangerous?
They’re not dangerous to eat accidentally, but their presence means something went wrong. Maggots come from fungus gnats laying eggs in wet medium. The fix is drying out the top layer between waterings and using yellow sticky traps to break the egg-laying cycle.
How do I remove stuck hulls without damaging the plant?
Mist the hulls lightly and wait 10–15 minutes. Then pinch the hull between two fingers and rock it gently side to side — don’t pull straight up. If it resists, mist again and wait. Forcing it will snap the stem.
Can mold on sunflower microgreens spread to other trays?
Yes, quickly. Mold releases spores into the air. Isolate any affected tray immediately, move it out of your growing area, and increase airflow across remaining trays. Wipe down nearby surfaces with diluted hydrogen peroxide.
What is the difference between mildew and mold on sunflower seeds?
Mildew stays flat on the surface and is usually white or gray. Mold grows in three dimensions — fuzzy, often green, black, or blue, and penetrates the material it’s growing on. Both are problems, but mold is harder to eliminate and more likely to spread.