The microgreen mold problem is one of the most common reasons new growers quit. You find white fuzz on day four, toss the tray, bleach everything, start over and two weeks later it’s back. Same spot. Different seeds. You start wondering if your grow space is just cursed.
Before you rip anything out: most white fuzz on microgreens isn’t mold. It’s root hairs. They look disturbingly similar, especially on radish and sunflower, and growers throw out perfectly good trays because of it every day.
When it actually is mold, the fix isn’t complicated, but it’s not a one-time thing either. The constant mold problem with microgreens usually means something in your setup keeps recreating the right conditions and until that changes, no spray treatment will hold. This piece covers how to tell root hairs from real mold, which varieties attract problems, what to do when it’s the soil causing it, and what prevention actually looks like in practice.
In This Article
Affiliate Disclosure: This post contains affiliate links. If you purchase through these links, I may earn a small commission at no extra cost to you. This helps keep the website and blog running so I can continue creating free content. Thank you for your support!
White Fuzz on Microgreens — Mold or Root Hairs?
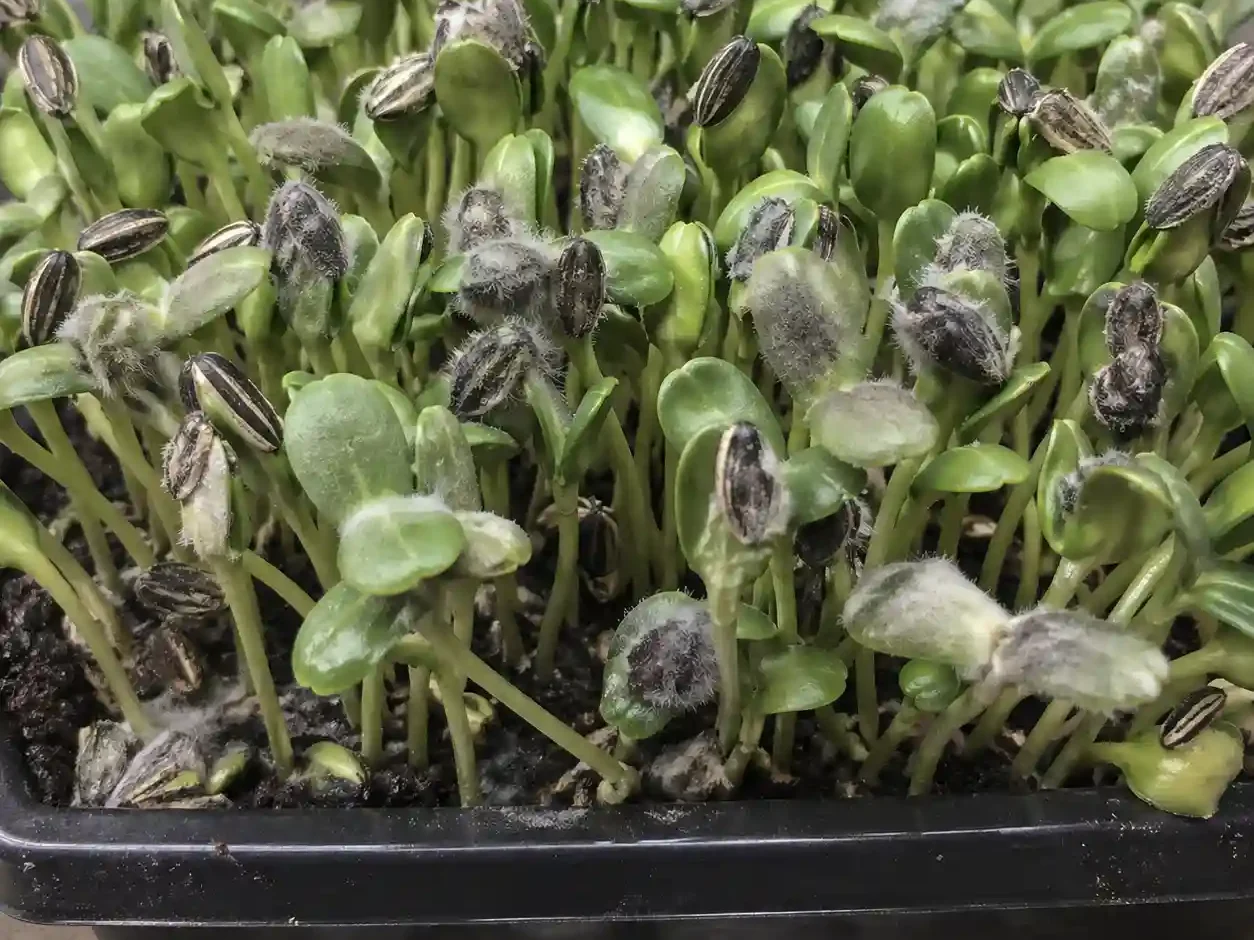
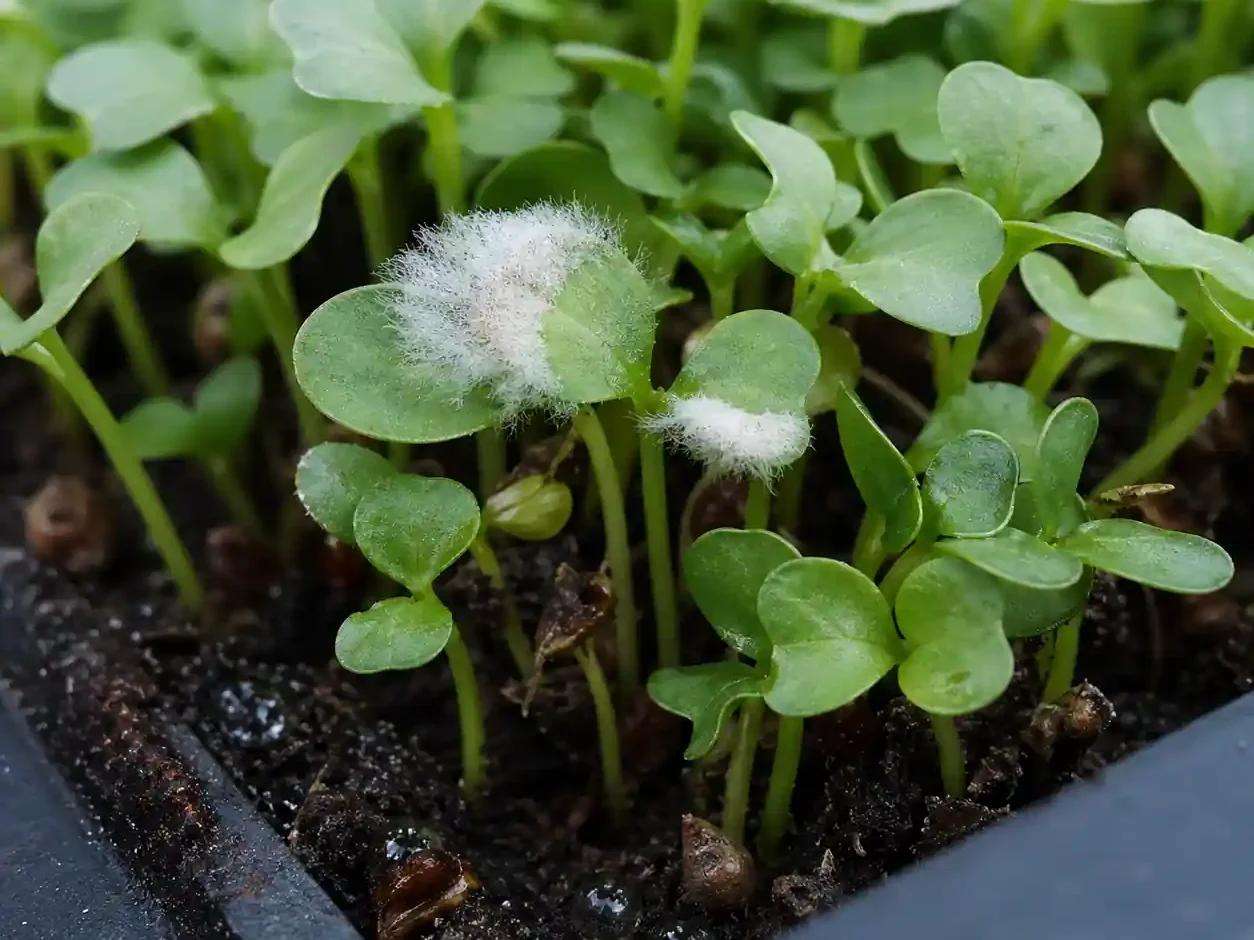
The single most common panic moment in microgreen growing: you lift a tray, see white fuzz at the base of your seedlings, and assume it’s over. Usually it’s not. What you’re looking at is probably root hairs, the tiny filaments roots grow to pull in water and nutrients. Completely normal. Showing up on day three or four is actually a good sign.
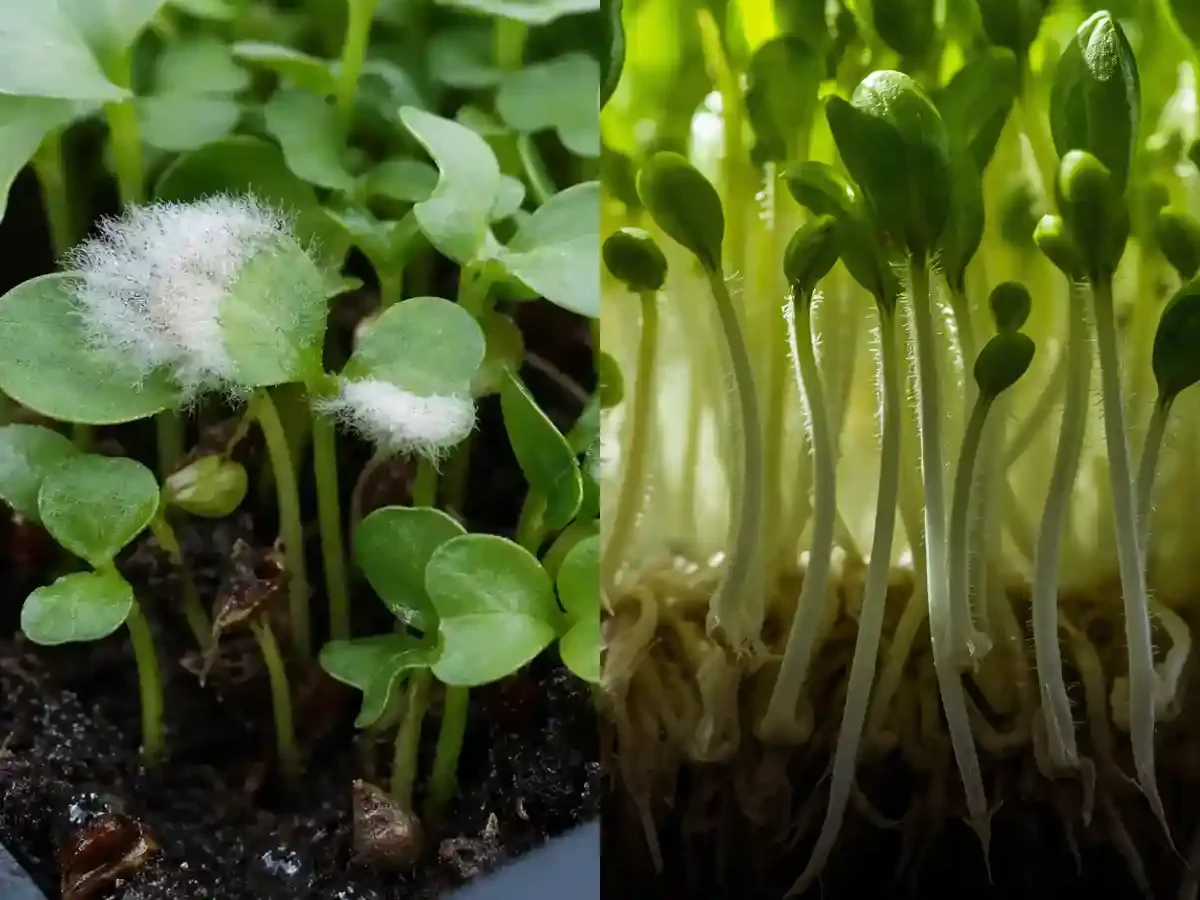
The problem is that root hairs and mold look nearly identical at a glance, and the stakes feel high enough that growers toss good trays rather than investigate. Here’s how to actually tell the difference.
Rinse it. Mist or lightly water the area. Root hairs flatten, go transparent, and mostly vanish. Mold doesn’t move. If the fuzz disappears after watering, you’re fine.
Check where it’s growing. Root hairs grow on roots, below the soil line, at the base of the stem. Mold spreads outward: up the stem, across the soil surface, onto neighboring seedlings. If the fuzz is strictly below, it’s almost certainly root hairs.
Smell it. Mold smells like a wet basement. Root hairs smell like nothing. If there’s any kind of musty odor coming from the tray, that’s your answer.
Touch it. Root hairs are soft and uniform. Mold is either slimy, the collapsed, wet kind or cobweb-like, with irregular strands that catch air when you disturb them.
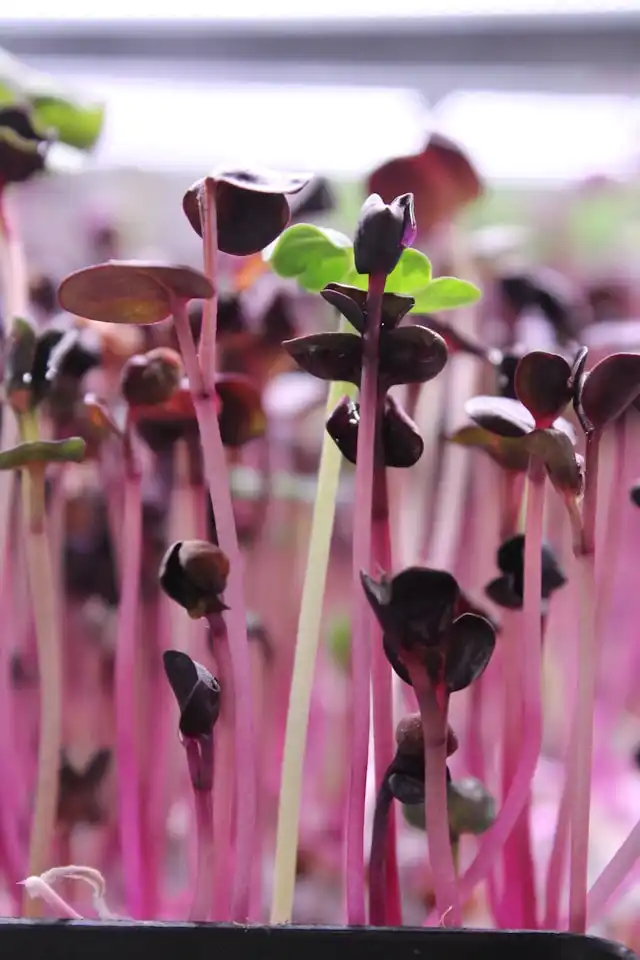
A few varieties make this call harder. Cilantro microgreens produce such dense, fuzzy root growth that even experienced growers stop and stare. If you’re wondering whether the white fuzz on microgreens is mold and you’re growing cilantro, sunflower, or radish, it’s root hairs. Those three get flagged constantly.
New to microgreens and seeing other issues too? 5 Common Problems Growing Microgreens and What to Do About Them
The Real Reasons Your Microgreen Mold Problem Keeps Coming Back
Most growers fix the symptom. They spray, they bleach, they start fresh, and the mold comes back in two weeks because nothing in the setup actually changed. The constant mold problem with microgreens almost always traces back to one of these six things.
Overwatering and how you’re watering matters. Top watering keeps the soil surface wet, which is exactly where mold wants to live. Bottom watering, where you set the tray in a shallow dish and let the soil draw moisture up from below, keeps the surface dry while the roots still get what they need. If you’re spraying the surface twice a day, that’s likely your first problem.
Blackout phase airflow. This one gets skipped in most beginner guides. When seeds are stacked under a cover for germination, the humidity inside that blackout dome can hit 90%+ within hours. No air movement, warm temperatures, trapped moisture, it’s a better environment for mold than it is for seeds. Lifting the cover for ten minutes once a day, or leaving a small gap for passive airflow, makes a real difference.
Seed density. Packing seeds too tightly means the stems never dry out between waterings. Air can’t move through a mat of overcrowded seedlings, and moisture stays trapped at the base, right where mold establishes itself first. Backing off seed density by even 20% often clears up recurring problems without changing anything else.
Contaminated trays. Spores survive washing, especially with dish soap alone. If you’re reusing trays without soaking them in a diluted bleach or hydrogen peroxide solution between grows, you’re re-inoculating every new batch from the start. Wipe, soak for ten minutes, rinse, dry completely before reuse.
Room humidity above 60%. Mold doesn’t need much encouragement when the ambient air is already saturated. A cheap hygrometer will tell you where you actually stand, most people are surprised. If you’re consistently above 60%, a small dehumidifier or better ventilation in the grow space will do more than any spray treatment.
Peat-based soil. This is the microgreen soil mold problem nobody talks about until they’ve switched substrates. Peat holds moisture longer than most alternatives and naturally carries higher levels of yeast and fungal material. Coco coir drains faster, dries out between waterings more reliably, and tends to produce far fewer mold issues. If you’ve ruled everything else out and still have a mold problem in the soil, the substrate itself is worth looking at.
Most types of mold problems with microgreens aren’t random. They’re the same conditions, recreated batch after batch, because the underlying setup hasn’t changed. Fix the environment and the mold usually stops coming back on its own.
Why Sunflower, Pea, and Cilantro Microgreens Get Mold the Worst
Not all microgreens mold equally. Some varieties are forgiving, you can overwater slightly, skip a day of airflow, and still pull a clean tray. Others seem to attract problems no matter what you do. Sunflower, peas, and cilantro sit at the top of that second list, and each for different reasons.
Sunflower Microgreens
Sunflower microgreen mold usually starts with the hull. The outer shell that protects the seed holds moisture long after the rest of the tray has dried out and wet hulls sitting against stems in a warm, low-airflow environment is basically a mold invitation. Fungus on sunflower microgreen seeds can establish before you even notice the hull is still attached.
Two things help. First, soaking time: 8–12 hours is enough. Longer than that and the seeds absorb more water than they need, which the hull then holds onto through germination. Second, the blackout phase needs real airflow, more than most other varieties. If you’re stacking trays tightly on sunflowers, you’re asking for mildew on sunflower seeds during microgreen germination. A small gap or a daily cover lift is worth the habit.
Dehulling after germination, if hulls are still clinging, also reduces the problem significantly.
Sunflower microgreens have more unique problems beyond mold, Sunflower Microgreen Problems: Pests, Mold and Leggy Growth Fixed.
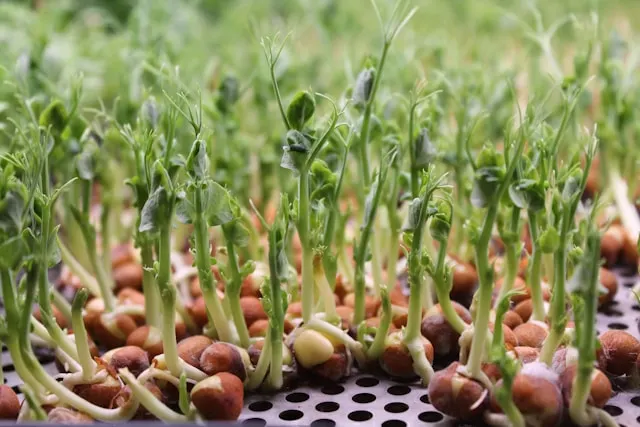
Pea Microgreens
Microgreen peas mold for a different reason: the seeds are large, get sown densely, and people over-soak them. Peas only need 8–12 hours in water. Push past 18 and the seeds become waterlogged, germination gets uneven, and the gaps between those big, tightly-packed seeds trap humidity at the base of the tray.
The fix is usually just backing off, shorter soak, slightly lower seed density, and bottom watering only. Peas are otherwise one of the faster, more reliable microgreens. The mold problem with microgreen sprouts in this category almost always comes back to the soak.
Cilantro Microgreens
Cilantro is its own category. The seeds germinate slowly, sometimes taking 7–10 days, and during that window, the soil surface stays moist long enough that most growers assume something is wrong. The seeds also produce fine, hair-like root growth that looks almost identical to fuzzy mold at first glance.
The question of whether microgreen cilantro looks like mold is genuinely hard to answer early on, because it kind of does. What’s normal: pale, uniform fuzz around the seed itself, no smell, no spread. What’s not: gray or green coloring, musty odor, fuzz appearing on the soil surface away from the seeds.
Cilantro also doesn’t need much water. It’s one of the drier-growing varieties, and keeping the surface too moist while waiting on slow germination is where actual mold gets a foothold.
Mold Risk by Variety
| Variety | Mold Risk | Main Cause | Quick Fix |
|---|---|---|---|
| Sunflower | High | Hull trapping moisture | Limit soak to 8–12 hrs, improve blackout airflow |
| Peas | Medium–High | Over-soaking, dense sowing | Shorter soak, reduce seed density, bottom water only |
| Cilantro | Medium | Slow germination, wet surface | Water less, expect slow progress, check smell not appearance |
| Radish | Low | Minimal if airflow is good | Standard care, watch seed density |
| Broccoli | Low–Medium | Fine seeds clump when wet | Thin sowing, avoid surface watering |
Mold on the Soil Surface vs Mold on the Stems — Why It Matters
Not all mold is equally bad news. Where it’s growing tells you more about how serious the problem is than what it looks like and it determines whether the tray is worth saving or headed for the compost.
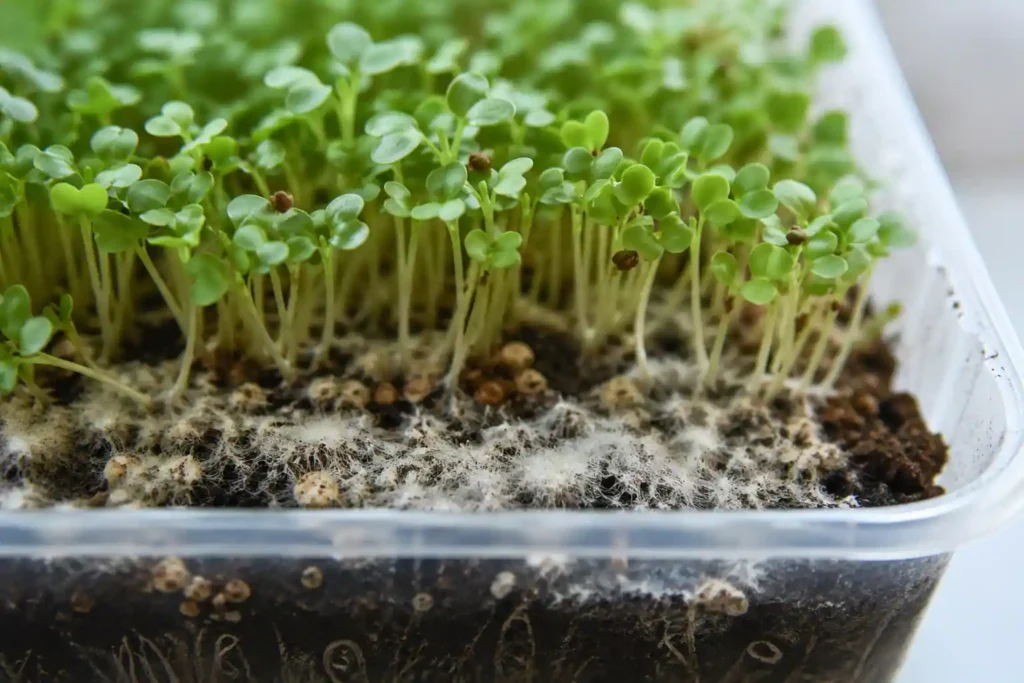
Soil Surface Mold
White, fuzzy growth sitting on top of the soil, not on the plants themselves, is usually saprophytic mold. It’s feeding on organic matter in the soil, not on your seedlings. This is the most common version of the microgreen soil mold problem, and while it looks alarming, it’s more of a warning sign than an emergency.
It means the soil surface is staying too wet for too long. Switch to bottom watering immediately, improve airflow, and the surface mold often stops spreading within a day or two. The seedlings themselves may be completely fine. Scraping the top layer of affected soil and dusting lightly with cinnamon or fine silica can also help arrest it without harming the plants.
Microgreen soil developed mold like this is fixable. It’s your setup telling you something is off before the real damage starts.
Stem Mold and Damping Off
This is the version that actually kills trays. Damping off in microgreens is a fungal condition, usually Pythium or Fusarium, that attacks the stem at or just below the soil line. The stem thins, pinches, goes translucent, and the seedling collapses. It spreads fast. A tray that looked fine at morning check can have a spreading dead zone by evening.
Microgreen damping off doesn’t look fuzzy the way soil mold does. It looks like seedlings melting. The stems go soft and water-soaked at the base, and once that happens to a plant, it’s gone. The danger is what’s spreading through the soil toward the plants that still look healthy.
Unlike surface mold, damping off is almost never stopped once it’s moving.
Saving the Tray vs Tossing It
Here’s a rough rule that holds up in practice: if less than 20% of the tray is affected and the mold is on the soil surface only, the tray is probably salvageable. Cut airflow time, switch watering methods, remove visibly affected material, and watch it closely for 24 hours.
If the mold is on stems, if seedlings are collapsing, or if more than 20% of the tray is involved, toss it. The spore load in that soil will keep going, and trying to save it usually just delays losing the whole batch by a few days while the problem spreads.
The other case for tossing immediately: smell. If the tray has a strong musty or rotten odor, the fungal load is already heavy enough that recovery is unlikely regardless of how it looks on the surface.
The Best Microgreen Mold Spray Options (And How to Use Them Safely)
If you’ve confirmed actual mold, not root hairs, not normal fuzz, and the tray is still worth saving, there are a few treatments that work. None of them are complicated. What matters is using the right one at the right dilution and knowing what to leave alone.
Hydrogen Peroxide (3%)
This is the most reliable microgreen mold spray option and the one most growers land on after trying other things. Hydrogen peroxide works by releasing oxygen on contact with mold cell walls, breaking them down without leaving chemical residue. It degrades into water and oxygen, so there’s no buildup and no harm to the plant if used correctly.
Dilution matters. For active mold treatment, mix one part 3% hydrogen peroxide with three parts water. Apply with a spray bottle, light misting across the affected soil surface or base of stems, not soaking. Once a day is enough. More than that and you risk damaging the root zone.
Does hydrogen peroxide kill mold on microgreens? Yes, on contact and at this dilution, consistently. It won’t reverse damping off that’s already progressing, but for surface mold caught early it works well.
Grapefruit Seed Extract
Less talked about, genuinely effective. Grapefruit seed extract has broad antifungal properties and sits well below hydrogen peroxide in terms of search volume, which is why most guides skip it, not because it doesn’t work. Mix 10–15 drops into a cup of water and apply the same way: light misting, once daily, soil surface only.
It has almost no odor, doesn’t stress the plants visibly, and is a reasonable first option for early-stage mold before you escalate to peroxide. For growers who want to stay away from anything that reads as a chemical treatment, this is the practical alternative.
Apple Cider Vinegar
Diluted ACV, roughly one tablespoon per cup of water, is a mild antifungal that works on surface mold in its earliest stages. The acidity disrupts mold growth without being aggressive enough to damage plants at this concentration. It’s not the strongest option, but if you catch the problem on day one, it’s worth trying before moving to peroxide.
Apply lightly to the soil surface only. Keep it off stems and leaves, ACV at any concentration can cause mild leaf burn if it sits on foliage.
One Important Safety Note
Do not mix hydrogen peroxide and vinegar together in the same spray bottle. Combined, they form peracetic acid, corrosive, irritating to lungs and eyes, and not something you want to mist over plants you’re about to eat. Use them separately, on different days if needed, but never combined.
Sunlight
For mild surface mold on trays that are close to harvest, moving them to direct sunlight for a few hours can slow or stop early mold growth without any spray at all. UV exposure is a natural mold inhibitor. It won’t fix a serious case, but for minor fuzz that appeared overnight on an otherwise healthy tray, light exposure plus reduced watering often handles it.
What Not to Use
Bleach kills mold, but it also kills your plants and leaves residue on food you’re going to eat. Don’t spray it on living trays. It’s useful for sterilizing empty trays between grows, not as a treatment for active crops.
Rubbing or wiping mold off stems is also a mistake. It spreads spores to healthy areas and damages the delicate stem tissue, giving mold a better entry point than it had before. Spray, don’t scrub.
Microgreen Mold Prevention — The Checklist That Actually Works
Most mold problems are solved before the seeds go in. The growers who stop dealing with it aren’t doing anything exotic, they’ve just built a few consistent habits that remove the conditions mold needs to get started. Here’s what that actually looks like.
Pre-soak seeds in hydrogen peroxide solution. Before planting, soak seeds for 5–10 minutes in a 3% hydrogen peroxide solution diluted 1:1 with water. This kills surface spores on the seed coat before they ever reach the soil. Rinse thoroughly after, then soak in plain water as normal if the variety requires it.
Choose the right substrate. Peat-heavy mixes hold moisture longer and carry higher baseline fungal loads. Coco coir drains faster, dries more evenly between waterings, and produces fewer mold issues across almost every variety. Microgreen mold prevention starts with the substrate, sterile seed-starting mixes or pure coco coir are the default choice for growers who’ve had recurring problems.
Bottom-water only, especially during germination. Top watering keeps the soil surface wet. Bottom watering keeps it dry. That one change eliminates the most common cause of mold on microgreen soil before the canopy even closes.
Run a small fan after blackout ends. Air movement is the fastest way to dry out the micro-environment around your stems. A gentle fan, not blasting directly at the tray, just circulating the room, makes a real difference in how quickly surface moisture clears after watering.
Don’t overseed. Crowded stems trap humidity between them. If you’re seeding as heavily as possible to maximize yield, you’re also maximizing the conditions that cause mold. Back off by 15–20% and airflow through the canopy improves noticeably.
Sanitize trays between every batch. Spores survive casual rinsing. Soak empty trays for 10 minutes in diluted hydrogen peroxide or diluted vinegar, not both together, rinse well, and let them dry completely before reuse. Skipping this step re-introduces mold from the previous grow regardless of what else you fix.
Keep room humidity between 50–60%. Above 60% and you’re fighting the ambient air on top of everything else. A hygrometer costs a few dollars. If you’re consistently running high, a small dehumidifier or improved ventilation in the grow space will do more for mold prevention than any spray treatment.
Remove sunflower hulls early. Hulls that cling past germination trap moisture against the stem. Pull them as soon as they loosen, it takes a few minutes per tray and cuts sunflower mold problems significantly.
None of these steps are difficult. Together, they remove almost every condition mold needs to establish, which is why growers who follow them consistently stop thinking about mold as a recurring problem at all.
Seed prep matters more than most guides admit Microgreen Seed Preparation Guide.
Frequently Asked Questions
Can you eat moldy microgreens?
No. Mold on microgreens can produce mycotoxins — compounds that cause nausea, digestive issues, and in some cases more serious reactions. If the mold is on stems or spread across the tray, toss it. White fuzz at the root base that disappears when rinsed is usually root hairs, not mold, and those are safe to eat.
Why do my microgreens have mold?
Usually one of three things: too much moisture on the soil surface, poor airflow during the blackout phase, or contaminated trays carrying spores from a previous batch. Overseeding and high room humidity above 60% also contribute. Fix the environment first — sprays alone won’t stop it coming back.
How do you get rid of mold on sprouts?
Mist the affected area with a diluted hydrogen peroxide solution — one part 3% peroxide to three parts water — once daily. Improve airflow, switch to bottom watering, and remove any visibly collapsed or slimy stems. If more than 20% of the tray is affected, the tray isn’t worth saving.
How do you remove fungus from microgreens?
For soil surface fungus caught early, diluted hydrogen peroxide or grapefruit seed extract spray applied once daily usually stops it. Don’t wipe or rub stems — that spreads spores. If it’s damping off at the stem base, removal isn’t realistic. That tray needs to go.
How do you tell if microgreens have gone bad?
Smell is the most reliable indicator — a musty or rotten odor means the fungal load is already heavy. Visually: slimy stems, collapsed seedlings, gray or green fuzz on the soil, or mold spreading beyond the root zone. Yellowing alone isn’t a sign of mold — check for smell and texture first.
Is mold harmful to seeds?
Yes. Heavy mold presence during germination competes with seeds for moisture and oxygen, produces compounds that inhibit germination, and can rot seeds before they sprout. Pre-soaking seeds in diluted hydrogen peroxide before planting kills surface spores and reduces this significantly.
Does hydrogen peroxide kill mold on microgreens?
Yes. A solution of one part 3% hydrogen peroxide to three parts water kills mold on contact by breaking down cell walls. It leaves no residue and degrades into water and oxygen. Apply as a light mist to affected areas once daily. It works well on surface mold caught early — it won’t reverse damping off that’s already progressing.