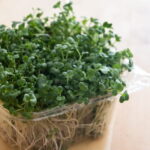
If you’ve been scrolling through food blogs or health content lately, chances are you’ve noticed microgreens popping up everywhere, and for good reason. Growing microgreens at home has become one of the fastest-growing food trends, and it’s not just a passing fad. These tiny, nutrient-packed greens are showing up in home kitchens across the world because they’re incredibly easy to grow, harvest in under two weeks, and deliver a serious nutritional punch compared to their full-grown counterparts.
Whether you’re a complete beginner or someone who’s dabbled in indoor gardening, learning how to grow microgreens at home doesn’t require a backyard, expensive equipment, or even much time. All you need is a tray, some seeds, a little light, and the right guidance.
In this complete guide, you’ll discover everything about grow your own microgreens journey, from choosing the best seeds for beginners to harvesting, storing, and even avoiding common mistakes. By the end, you’ll be ready to set up your very own micro garden and enjoy fresh greens right from your windowsill.
In This Article
What Is a Micro Herb? Understanding Microgreens
If you’ve ever wondered what is a micro herb or heard the word “microgreens” tossed around but weren’t quite sure what it means, you’re not alone. These tiny greens have taken the culinary and wellness world by storm, but there’s still a lot of confusion around what they actually are, especially when compared to sprouts and baby greens.
Microgreens: The Simple Definition
Microgreens are young, edible seedlings of vegetables, herbs, and flowers harvested just after the first true leaves, called cotyledons have developed. They are typically harvested between 7 to 14 days after germination, standing anywhere from 1 to 3 inches tall.
A micro grow refers to this entire compact growing cycle, from seed to harvest, done in a small tray, making it perfect for home kitchens, apartments, and windowsills. Unlike full-grown vegetables that take weeks or months, microgreens deliver fresh, flavorful produce in less than two weeks.
Micro Herb vs Microgreens — Is There a Difference?
The terms micro herb and microgreens are often used interchangeably, but there’s a subtle difference worth knowing:
- Microgreens is the broader category, it includes vegetable seedlings like radish, sunflower, pea shoots, and broccoli.
- Micro herbs specifically refer to the miniature versions of culinary herbs, think tiny basil, micro cilantro, micro dill, or miniature chives.
In practice, both are grown and harvested the same way. Whether you call them microgreens or micro herbs, the growing process, nutritional benefits, and uses in the kitchen are essentially the same.
Microgreens vs Sprouts vs Baby Greens — What’s the Difference?
This is one of the most common points of confusion for beginners. Here’s a simple breakdown:
| Sprouts | Microgreens | Baby Greens | |
|---|---|---|---|
| Harvested at | 2–7 days | 7–14 days | 20–40 days |
| Grown in | Water (no soil) | Soil or growing mat | Soil |
| Part eaten | Seed + root + stem | Stem + leaves | Leaves only |
| Light needed | No | Yes | Yes |
| Flavor | Mild | Intense & concentrated | Mild to moderate |
| Nutrition | High | Very high | Moderate |
The key difference is that sprouts are grown entirely in water and eaten whole, root and all, while microgreens are grown in a growing medium and only the stem and leaves above the soil are harvested. Baby greens, on the other hand, are simply young versions of full-grown plants like spinach or arugula, harvested slightly later than microgreens.
A Brief History of Microgreens
Microgreens may feel like a modern food trend, but their roots go back further than you might think. They first appeared on the culinary scene in San Francisco in the 1980s, where chefs began using them as garnishes and flavor accents in upscale restaurant dishes. By the 1990s, they had spread across California’s fine dining scene.
Fast forward to today, microgreens have moved far beyond restaurant plates. Thanks to social media, the rise of health-conscious eating, and the urban gardening movement, millions of people are now discovering the joy of growing their own microgreens at home.
Why Are Microgreens So Popular Right Now?
The micro grow movement has exploded for several compelling reasons:
- Nutrition density — Studies show microgreens can contain up to 40 times more nutrients than their mature counterparts
- Space efficiency — They grow in a single tray on any windowsill or countertop
- Speed — From seed to harvest in as little as 7 days
- Cost-effective — A small investment in seeds and trays yields multiple harvests
- Sustainability — Homegrown microgreens reduce packaging waste and food miles
- Culinary versatility — Chefs and home cooks love them for their bold, concentrated flavors
Whether you’re drawn to microgreens for health reasons, sustainability, or simply the satisfaction of growing your own food, there has never been a better time to start your micro garden at home.
Advantages of Microgreens — Why You Should Grow Them
Microgreens are not just pretty garnishes, they are nutritional powerhouses packed into a tiny package. The advantages of microgreens go far beyond their size, making them one of the smartest additions you can make to your daily diet. Here’s why health experts, nutritionists, and home gardeners are all talking about them.
Nutritional Benefits of Microgreens
Despite being harvested at just 7–14 days old, microgreens are loaded with an impressive concentration of vitamins, minerals, and antioxidants. Research from the University of Maryland found that microgreens contain anywhere from 4 to 40 times more nutrients than their fully mature counterparts, making every tiny leaf count.
Here’s a snapshot of what you get nutritionally:
| Nutrient | Benefit | Top Microgreen Source |
|---|---|---|
| Vitamin C | Immune support, skin health | Red cabbage, broccoli |
| Vitamin E | Antioxidant, heart health | Sunflower, amaranth |
| Vitamin K | Bone health, blood clotting | Radish, broccoli |
| Beta-Carotene | Eye health, immunity | Pea shoots, cress |
| Potassium | Heart & muscle function | Sunflower, pea shoots |
| Folate | Cell repair, pregnancy health | Beet, lentil |
| Iron | Energy, oxygen transport | Fenugreek, spinach |
| Antioxidants | Anti-inflammatory, anti-aging | Amaranth, red cabbage |
Which Microgreen Has the Most Potassium?
If potassium is a priority in your diet, whether for heart health, muscle recovery, or managing blood pressure, you’ll want to know which microgreen has the most potassium.
The answer is sunflower microgreens. They are consistently ranked among the highest in potassium content, followed closely by:
- Pea shoot microgreens — rich in potassium and also high in vitamin C
- Beet microgreens — excellent potassium source with a beautiful deep color
- Buckwheat microgreens — potassium-rich with a mild, nutty flavor
- Spinach microgreens — a great everyday potassium boost
Adding a daily handful of sunflower or pea shoot microgreens to your salads, smoothies, or sandwiches is one of the easiest ways to naturally increase your potassium intake without supplements.
Is Eating Microgreens Every Day Good for You?
The short answer, yes, absolutely. But let’s break it down properly.
Is eating microgreens everyday good for you? For most healthy adults, consuming microgreens daily is not only safe but highly beneficial. Here’s why:
- They are rich in anti-inflammatory compounds that support long-term health
- Their high antioxidant content helps fight free radical damage
- They support gut health thanks to their fiber content
- They are low in calories yet dense in micronutrients
- Regular consumption may help reduce the risk of heart disease, diabetes, and obesity
However, a couple of things to keep in mind:
- People on blood thinners (like warfarin) should moderate their intake of high Vitamin K microgreens like broccoli and radish, always consult your doctor
- Variety is key — rotating between different microgreens ensures you get a broader spectrum of nutrients rather than over-relying on one type
Microgreens vs Full-Grown Vegetables — How Do They Compare?
Still on the fence about whether microgreens are worth growing? This comparison settles it:
| Microgreens | Full-Grown Vegetables | |
|---|---|---|
| Nutrient density | Up to 40x higher | Moderate |
| Grow time | 7–14 days | Weeks to months |
| Space required | One small tray | Garden bed or large pot |
| Cost to grow | Very low | Low to moderate |
| Flavor intensity | Bold & concentrated | Milder |
| Availability | Year-round indoors | Seasonal |
| Shelf life | 5–7 days after harvest | Varies by vegetable |
The verdict is clear, microgreens offer an unmatched combination of nutrition, convenience, and speed that full-grown vegetables simply can’t match when it comes to home growing.
Is It Worth It to Grow Your Own Microgreens at Home?

One of the first questions beginners ask is, is it worth it to grow your own microgreens, or is it easier to just grab a pack from the store? Let’s break it down honestly.
Cost Breakdown: Store-Bought vs Homegrown
| Store-Bought | Homegrown | |
|---|---|---|
| Cost per harvest | $4–$8 per small pack | $0.50–$1.50 per tray |
| Setup cost | None | $20–$40 one-time |
| Freshness | Days old | Harvested same day |
| Variety | Limited | Unlimited |
| Long-term value | Expensive over time | Pays off within weeks |
A single pack of store-bought microgreens costs anywhere between $4 to $8 for a small 2–3 oz portion. At home, that same amount costs less than $1.50 in seeds, using the same tray repeatedly.
Time Investment vs Reward
Growing microgreens at home requires surprisingly little time, roughly 5 to 10 minutes per day for watering and monitoring. With a harvest cycle of just 7–14 days, the time-to-reward ratio is genuinely one of the best in home gardening.
Is It Cheaper to Grow or Buy Microgreens?
Without question — growing wins. After a small one-time setup investment, grow microgreens at home costs a fraction of store prices. If you consume microgreens even twice a week, you’ll break even within the first month and save significantly every month after that.
Best Microgreens to Grow at Home (Especially for Beginners)
Choosing the right variety is half the battle. The best microgreens to grow at home are ones that germinate fast, resist mold, and deliver big flavor, even if you’ve never grown anything before. Here are the top picks for beginners.
What Are the Best Microgreens for Beginners?
If you’re just starting out, stick to varieties that are forgiving, fast-growing, and hard to mess up:
Radish — The ultimate beginner crop. Germinates in just 5–7 days, nearly impossible to fail, and delivers a satisfying spicy kick to salads and sandwiches.
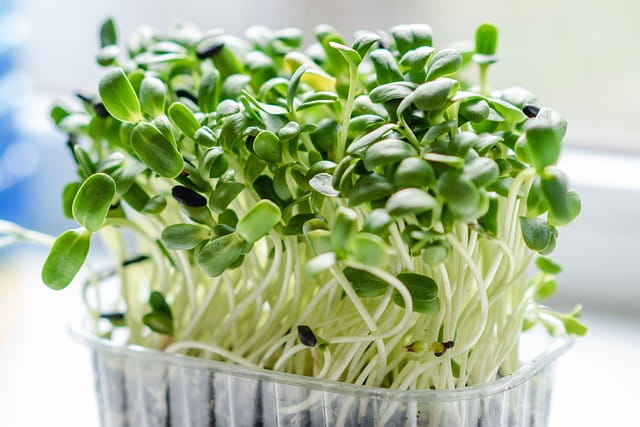
Sunflower — Large seeds that are easy to handle, thick crunchy stems, and a nutty flavor that almost everyone loves. Ready in 7–10 days.
Pea Shoots — Sweet, fresh, and incredibly forgiving. Kids love the mild flavor and they grow beautifully on a sunny windowsill in 8–12 days.
Broccoli — One of the most nutritious options available. Mild, earthy flavor and ready in just 5–7 days, a staple for health-conscious growers. Learn exactly how to grow them with our How to Grow Broccoli Microgreens at Home guide.
Mustard — Fast, bold, and spicy. Germinates quickly and adds a serious flavor punch to any dish in under a week.
Cabbage — Mild and slightly sweet, cabbage microgreens are low-maintenance and perfect for beginners with limited light.
Kale — Slightly more patient than radish but worth the wait. Earthy, nutrient-dense, and one of the best microgreens to grow at home for long-term health.
Arugula — Peppery and tangy, arugula microgreens add a gourmet touch to any plate and grow well with minimal fuss.
Beet — Stunning deep red color with a naturally sweet, earthy flavor. Takes slightly longer at 8–12 days but visually one of the most rewarding.
Cilantro — The most challenging on this list but worth attempting once you’ve built confidence. Fresh and citrusy, ready in 10–14 days.
Best Way to Grow Microgreens at Home by Type
The best way to grow microgreens at home depends on the variety you choose:
- Soil-lovers: Sunflower, pea shoots, and kale thrive in a shallow tray filled with good quality potting mix
- Hydroponic-friendly: Radish, broccoli, and mustard grow beautifully on hemp or jute mats with no soil needed
- Windowsill growers: Cabbage and arugula need minimal light making them perfect for low-light kitchens and apartments
Start with radish, sunflower, or pea shoots, nail those first and you’ll have the confidence to grow anything.
What You Need Before Planting Microgreens
Before your first micro grow, gathering the right supplies makes all the difference between a thriving tray and a failed harvest. The good news? Setting up the micro garden at home requires minimal investment and almost no space.
Trays are your foundation, shallow, flat trays (typically 10×20 inches) work best. You’ll want two: one with drainage holes for the seeds, and one solid tray underneath to catch water. For your growing medium, you have two solid options: a fine potting mix or coconut coir for a soil-based setup, or reusable hydroponic grow mats for a cleaner, mess-free alternative. Both produce excellent results.
Seeds are the heart of every micro grow, choose varieties like sunflower, radish, pea shoots, or broccoli for fast, beginner-friendly results. Beyond seeds, you’ll need a light source (a sunny south-facing windowsill works, or a simple grow light for consistent results year-round) and a spray bottle to mist your greens gently without disturbing delicate roots.
That’s genuinely all it takes to launch the micro garden of your dreams, a small upfront setup that pays back in fresh, nutritious harvests week after week.
How to Grow Microgreens at Home — Step-by-Step
You can grow microgreens at home — and it’s far simpler than most people expect. Here’s exactly how to grow microgreens from seed to harvest in as little as 7–14 days.
Step 1: Choose Your Seeds
Start with fast-growing, beginner-friendly varieties like radish, broccoli, sunflower, or pea shoots. Buy seeds labelled specifically for microgreens to ensure they’re untreated and food-safe. Each variety has a slightly different flavor profile and grow time, so don’t be afraid to experiment.
Step 2: Prepare Your Tray and Growing Medium
Fill your drainage tray with about an inch of moist potting mix or lay your hydroponic mat flat. Level the surface evenly, consistent depth means even germination. If you’re using soil, press it gently firm but don’t compact it.
Step 3: Sow Your Seeds
Scatter seeds densely and evenly across the surface. Larger seeds like sunflower and pea benefit from pre-soaking in water for 8–12 hours beforehand, this softens the seed coat and dramatically speeds up germination. After sowing, mist the surface thoroughly and press seeds lightly into contact with the medium.
Step 4: The Blackout/Germination Phase
Cover your tray with a second tray or a dark lid and place it somewhere warm (65–75°F / 18–24°C). This blackout phase mimics underground conditions, encouraging strong, upward root drive. Check once daily and mist if the surface feels dry. Most seeds germinate visibly within 2–4 days.
Step 5: Light and Watering Routine
Once sprouts are pushing against the cover (or reaching about an inch tall), remove the lid and move your tray into bright light, a south-facing window or grow light works well. Aim for 12–16 hours of light daily. From here, water from the bottom by pouring water into the solid catch tray; this prevents mold and keeps delicate leaves dry. Check moisture levels daily.
Step 6: Harvest at Peak Nutrition
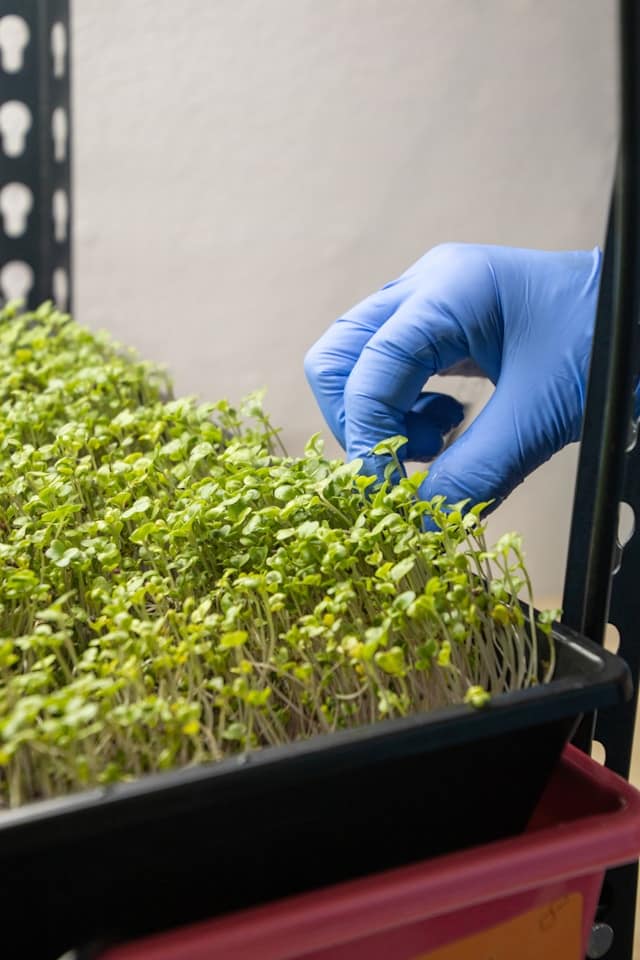
This is the most rewarding part of learning how to grow micro greens, knowing exactly when to cut. Harvest when the first true leaves appear and the greens are standing tall and vibrant, typically between days 7 and 14 depending on the variety. Snip just above the soil line with clean scissors, rinse, and serve immediately for maximum nutrition and flavor.
How to Grow Hydroponic Microgreens at Home
Learning how to grow hydroponic microgreens at home is easier than the word “hydroponic” suggests. No complicated systems, no pumps, no special equipment, just seeds, water, and the right growing mat.
What Is Hydroponic Growing for Microgreens? Hydroponic growing simply means raising plants without soil, using a water-retentive medium as the root anchor instead. For microgreens, this translates to laying a flat grow mat in your tray, keeping it consistently moist, and letting the roots do the rest. It’s one of the cleanest, most low-maintenance ways to grow microgreens without soil at home.
Best Hydroponic Mediums: Three materials dominate the hydroponic microgreen world:
- Jute mats — biodegradable, natural fibre pads that hold moisture well and compost after use
- Coco coir pads — made from compressed coconut husk, excellent water retention, naturally antifungal
- Hemp pads — arguably the most popular choice; food-safe, clean, and remarkably consistent for germination
All three are widely available, inexpensive, and reusable for certain varieties. Your choice mostly comes down to personal preference and seed type.
Hydroponic vs. Soil Growing — Pros and Cons
| Hydroponic | Soil | |
|---|---|---|
| Cleanliness | Very clean, no mess | Soil tracking and dust |
| Mould risk | Lower with good airflow | Slightly higher |
| Cost | Low ongoing cost | Low ongoing cost |
| Root support | Less ideal for large seeds | Better for pea, sunflower |
| Flavour | Clean, pure taste | Slightly earthier taste |
| Sustainability | Biodegradable mat options | Compostable medium |
Step-by-Step Hydroponic Method
- Cut your mat to fit snugly inside your drainage tray with no gaps at the edges
- Soak the mat thoroughly with clean water until fully saturated, then drain any standing excess
- Sow seeds densely and evenly across the surface, pressing them gently into contact with the mat fibres
- Cover and blackout for 2–4 days, misting lightly once daily if the mat surface feels dry
- Uncover and light once sprouts reach about an inch — bottom-water only from here by adding water to the catch tray beneath
- Harvest at days 7–12 by snipping above the mat, rinse well, and enjoy
Do Microgreens Grow Back After Cutting Them?
It’s one of the most common questions beginners ask, and the honest answer is: most microgreens do not regrow after cutting. Unlike herbs, microgreens are harvested at the seedling stage, before the plant has developed the energy reserves needed to regenerate new growth from the cut stem.
Which Microgreens Regrow (and Which Don’t) A small number of varieties, notably pea shoots and certain bean varieties, can produce a second flush after cutting if the growing conditions remain good and enough stem is left above the medium. However, most popular varieties including radish, broccoli, sunflower, amaranth, and basil are one-and-done harvests. Attempting to regrow them typically results in weak, sparse, and flavorless second growth not worth the wait.
What Happens If You Let Microgreens Keep Growing This is where things get interesting. If you let microgreens grow beyond harvest stage, they transition into baby salad greens, still edible, but with a tougher texture, more bitter flavor, and reduced nutritional density compared to peak microgreen stage. Some varieties eventually bolt and become too fibrous to eat pleasantly.
Maximising Your Harvest The best strategy is to stagger your planting, sow a new tray every 5–7 days so you always have a fresh crop ready to cut. This rolling harvest system keeps your kitchen continuously stocked without relying on regrowth.
How Long Will Microgreens Last? Storage & Shelf Life
Knowing how long microgreens will last is just as important as growing them well, poor storage can turn a perfect harvest stale within days. The good news is that with the right approach, freshly cut microgreens stay crisp and nutritious for longer than most people expect.
Shelf Life After Harvest Left on the counter at room temperature, cut microgreens will wilt and deteriorate within 1–2 days. Stored correctly in the refrigerator, most varieties stay fresh for 5–10 days after harvest. Hardier varieties like sunflower and pea shoots tend to last toward the longer end, while delicate varieties like basil or amaranth fade faster.
Best Storage Methods The key to extending freshness is controlling moisture, too much causes slime and mold, too little causes wilting. After harvesting, allow microgreens to fully dry before storing. Place them loosely in an airtight container lined with a dry paper towel, which absorbs excess moisture without drying the greens out. Store in the coldest part of your fridge, ideally between 35–40°F (2–4°C). Avoid washing until just before eating, excess moisture dramatically shortens shelf life.
For the absolute longest shelf life, consider harvesting directly into the container rather than rinsing and transferring multiple times.
Signs Microgreens Have Gone Bad Discard your microgreens if you notice a slimy texture, yellowing or browning leaves, an unpleasant sour smell, or visible mold at the stem base. Fresh microgreens should smell clean, earthy, and vegetal, trust your senses.
Disadvantages of Microgreens — What No One Tells You
Microgreens are genuinely rewarding to grow, but honest growers will tell you there are real challenges worth understanding before you start. Here’s a clear look at the downsides of microgreens farming at home that most beginner guides skip over.
Mold Risk and Humidity Challenges This is the most frustrating obstacle beginners face. The warm, moist conditions that microgreens love are equally ideal for mold growth, particularly during the blackout germination phase. Poor air circulation, overwatering, or sowing seeds too densely can trigger fuzzy white mold that ruins an entire tray. Managing humidity carefully and ensuring adequate airflow after germination is essential but takes practice to get right.
Short Shelf Life As covered above, cut microgreens last only 5–10 days refrigerated. This means the disadvantages of microgreens farming include the constant pressure to grow, harvest, consume, and replant on a tight rolling schedule. For busy households, that rhythm can feel demanding rather than enjoyable.
Upfront Cost of Supplies While microgreens are inexpensive to maintain, the initial setup, quality trays, grow lights, seeds, and growing medium, adds up faster than expected. Specialty seeds in particular can be surprisingly costly, especially for slower-growing premium varieties like sunflower or nasturtium.
Time and Consistency Required Microgreens don’t tolerate neglect. Missing a day of bottom-watering during the light phase can dry out a tray entirely. Success depends on checking your crops daily, a small but genuine commitment that catches some growers off guard.
Frequently Asked Questions
Is it easy to grow microgreens at home?
Yes — microgreens are one of the most beginner-friendly crops you can grow indoors. With a tray, seeds, a light source, and a spray bottle, most varieties are ready to harvest within 7–14 days. The learning curve is gentle, and small mistakes rarely ruin an entire crop permanently.
Do microgreens regrow after cutting them?
Most don’t. The majority of popular varieties, radish, broccoli, sunflower, are single-harvest crops. Pea shoots are a notable exception and can produce a modest second flush if conditions are right and enough stem remains after cutting.
Which microgreens are best for diabetics?
Fenugreek, broccoli, and bitter melon microgreens are frequently highlighted for their potential blood sugar benefits. Broccoli microgreens in particular contain sulforaphane, a compound studied for its role in improving insulin sensitivity. Always consult a healthcare professional before using food therapeutically.
Can microgreens help lower cholesterol?
Some research suggests certain varieties, particularly sunflower, flaxseed, and red cabbage microgreens, contain compounds that may support healthy cholesterol levels. They’re rich in fiber, antioxidants, and plant sterols, all of which play a role in cardiovascular health. Again, consult your doctor for personalized guidance.
Can I grow microgreens without soil?
Absolutely. Hydroponic growing mats made from jute, hemp, or coco coir are excellent soil-free alternatives. They’re cleaner, easier to manage indoors, and produce equally nutritious harvests without any potting mix.
How long do microgreens take to grow?
Most varieties are ready to harvest between 7 and 14 days from sowing. Fast growers like radish and mustard can be ready in as little as 5–7 days, while slower varieties like sunflower or beet typically take closer to 10–14 days.
What are the disadvantages of microgreens farming?
The main challenges include mold risk during germination, a short post-harvest shelf life of 5–10 days, upfront costs for supplies and lighting, and the need for daily attention to watering and airflow. None are dealbreakers, but they do require consistency.
When should you not eat microgreens?
Avoid eating microgreens that show signs of mold, sliminess, yellowing, or an off smell. Additionally, people on blood-thinning medications like warfarin should be cautious with large quantities of microgreens high in vitamin K, such as kale or broccoli, and seek medical advice.
What seeds should not be used for microgreens?
Avoid any seeds treated with fungicides or pesticides, always buy food-grade or microgreen-specific seeds. Certain plants from the nightshade family, including tomato and pepper, produce greens that can be mildly toxic at the seedling stage and are not recommended for microgreen growing.
Are microgreens good for your liver?
Emerging research is promising. Broccoli microgreens, rich in sulforaphane, have been studied for their potential to support liver detoxification pathways and reduce oxidative stress. Radish and beet microgreens also contain compounds traditionally associated with liver health, though more clinical research is ongoing.